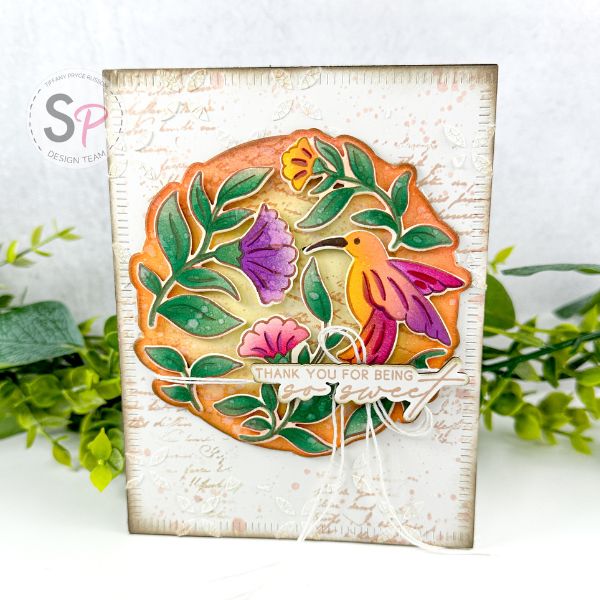
Hey friends! Tiffany here with some more inspiration for you. Today, I am featuring the recently released Pure Joy product suite from Pinkfresh Studio. I've noticed that the older I get, the more I love birds and bird watching. It seems to be a trend among my friends, ha. How about you? I adore hummingbirds so this stamp set is perfect for any bird lover. Let's get into how I made this card.

To start, I used the Pure Joy Press Plate with the Betterpress machine. I inked the press plate well with Pinkfresh Doe ink and ran it through my Platinum 6 die cutting machine. 
Using the coordinating stencils, I ink blended the images using detailed blending brushes. The openings are pretty small and I wanted some variation of color so small, detailed brushes worked best. I ink blended everything with Pinkfresh inks and then die cut with the coordinating dies.
Leaves - Green Gables inks
Flowers - Soul of Provence inks, Fairy Dust inks, Rise and Shine inks
Bird - Sweet Mustard, Coral Reef, Raspberry Bliss, Candy Violet, Lavender
I also die cut the background piece and lightly ink blended around the edges with Coral Reef and Lemon Whip. I stamped a script stamp using Doe ink randomly. I used a Hero Arts stamp set, but the script stamp in Spellbinders Sunflower Greetings will work well too. Lastly, I splattered with diluted brown ink and a little gold.
Using the die as a guide, I popped up all the ink blended die cuts on the background with foam tape. For a vintage touch, I ink blended the edges with Pinkfresh Warm Buff ink and splattered with water for a distressing effect. Finally, I added some white twine around the bottom of the piece and added a sentiment from the Pure Joy stamp set. The sentiment was stamped in Warm Buff and die cut. Again, I added a little brown ink around the sentiment for continuity.

Once the focal point was finished, I worked on the card background. I wanted to bring in a few more vintage touches to carry the theme through. On an A2 white panel, I used the same script stamp randomly and die cut it with the Blanket Stitched Rectangles. For additional texture, I used one stencil in Geometric Tile with crackle paste. Once dry, I inked the edges with Doe ink and splattered with diluted ink.


Finally, I adhered everything together on an A2 card base.

Hope you liked this colorful, yet vintage card. Thanks for reading!
Supplies: