CARD #1
- Start out by cutting down a piece of cardstock to 4 x 5 ¼. This is your card insert.
- Add adhesive to the back of your Victorian Corner dies (cut 2) and apply to the corners of the insert.
- Attach the insert to the right inside panel of the Craft Perfect card blank - using ¼ scrappy tape.
- Cut (1) each of the two middle dies in the Decorative Labels Eight die set.
- Attach the larger of the two to the front of the card panel.
- Add 3D foam dots to the back of the second die and lay on top of the previous die cut.
- Cut (1) of the label die (center piece) in the 5x7 Elegant Labels Four die set and apply ribbon to the sliders and secure to the back to hide ends.
- Add 3D foam dots to the back of the label and hot glue to secure to the front panel. Lay on top of the previous die.
- Stamp the “hello” sentiment from Floating Wishes stamp set (Avery Elle) on to a piece of cardstock using Gina K Designs Ink (jet black).
- Wipe /tape off the ink from the ends of the sentiment so that it fits nicely on the label. Fish tail – if desired.
- Add ¼” scrappy tape to secure on to the last label.
- Add Nuvo Crystal Drops in white around the perimeter of the card – as desired.
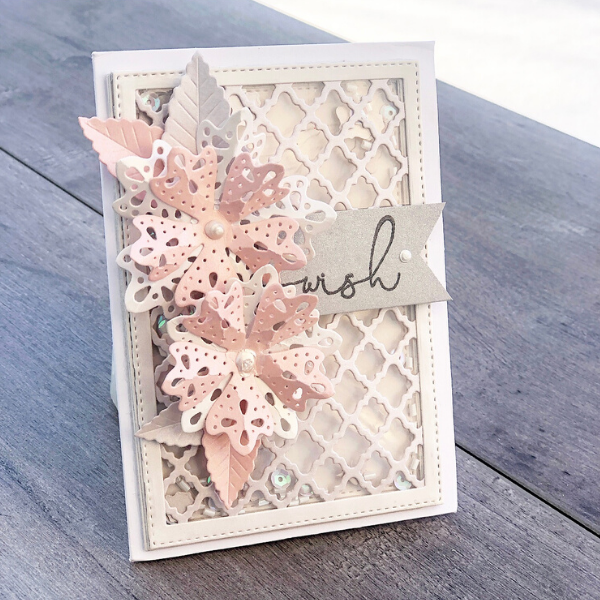
CARD #2
- Using your rectangle nesting die, position the rectangles so that it creates a nice even frame. Use washi tape to secure to get exact duplicates.
- Cut 6 times (depending on thickness of paper) you want to create a little ‘well’ to hold the sequence/shaker mix.
- Set (1) negative rectangle and (1) frame aside for later.
- Using wet glue, adhere (5) of frames together – on top of each other.
- Cut (1) of the Fancy Lattice die in desired paper.
- Apply spray adhesive (works best and easiest) to the back of the lattice cut and lay on top of lawn Fawn acetate.
- Grab the last remaining frame, apply wet glue to the back and lay on top (center) of the lattice and acetate combo.
- Cut off excess using a trimmer for a clean and even cut.
- Grab your card base (Craft Perfect) – cut it down if needed so that it creates a ¼ border around the perimeter of the card.
- Cut a piece of cardstock down to make an insert – depending on the size of your card.
- Stamp your sentiment using the Avery Elle stamp set and Gina K Designs Ink (jet black). I cut my stamp into two separate pieces. (Wish Big)
- Center ‘Big’ sentiment onto the card stock insert and stamp. I added three tiny dots in front of my sentiment.
- Apply adhesive to the card stock insert and place (right) on inside of (Craft Perfect) card base.
- Grab the stack of frames and apply wet glue to the back of the stack and center on top of card front.
- Add the (1) negative frame base to the center of the frame using ¼” scrappy tape. Make sure it lays flat.
- Add the negative tiny pieces of the lattice die to the inside of the ‘well’ as well as any desired sequence and seed beads.
- Add wet glue to the perimeter of the lattice topper and secure on top of the frame ‘well’.
- Cut (1) middle flower and (3) small flowers form the Laced Flowers die Set.
- Pinch the edges of the petals together on all flowers. Press the center of each flower in the palm of your hand to create dimension.
- Layer (1) large and (1) small together (offset) on top of each other with hot glue.
- Layer the remaining (2) small flowers together (offset) with hot glue.
- Add 3D foam square to the back of both flower sets.
- Cut (2) sets of leaves from the Cinch and Go Four and pinch up. Follow the center line.
- Attach the two leaves together at the end – twice.
- Stamp ‘Wish’ onto cardstock and apply 3D foam squares to the back – fishtail if desired.
- Add the (2) flower sets to the front of the card and tuck the leaves underneath each set.
- Add a drop of Nuvo (ivory seashell) to the end of the sentiment.
Product List:
Spellbinders Nestabilities Card Creator Dies - 5x7 Elegant Labels Four
Spellbinders Nestabilities Decorative Elements Die Set - Decorative Labels Eight
Spellbinders Shapeabilities Dies D-Lites - Victorian Corners
Avery Elle Clear Stamps - Floating Wishes
Scrapbook Adhesives 3D Permanent Foam Squares - White 1/2" x 1/2", 126 pk
Gina K. Designs Amalgam Ink Pad - Jet Black
Craft Perfect - Card Blanks & Envelopes - Bright White, 10 pk
Nuvo Grande Crystal Drops - Gloss – White
Nuvo Grande Crystal Drops - Metallic - Ivory Seashell
Spellbinders Shapeabilities Dies - Cinch and Go Four
Spellbinders Expandable Patterns Die - Fancy Lattice
Spellbinders Shapeabilities Dies - Laced Flowers
Lawn Fawn Acetate
Hero Arts Dies – Infinity Nesting Rectangle (substitution)


