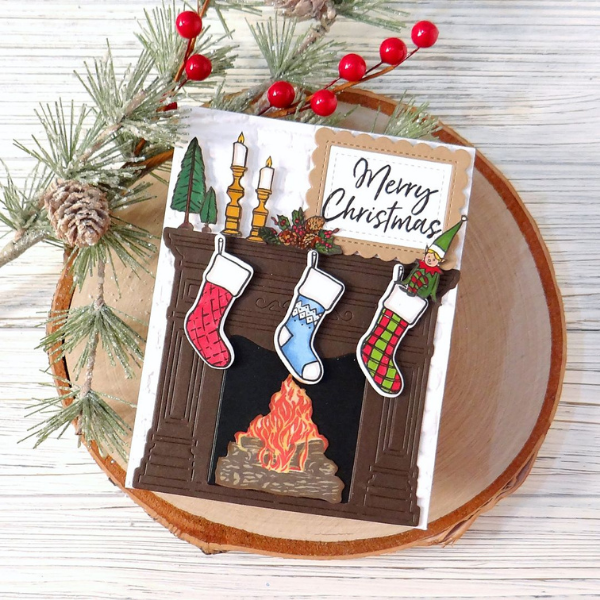
“All the stockings were hung by the chimney with care…” That’s what kept going through my mind as I was creating with the new Hero Arts Fireplace Stamp & Cut! I grew up in an apartment – which didn’t have a fireplace – but we still hung my stocking – it was just on a furniture knob in the living room (lol!)

The first thing I did was get all the pieces ready:
- Cut brown cardstock with the fireplace die from the set. I then cut black cardstock for the inside of the fireplace.
- Stamped and colored all the images. For the fireplace, being a layered stamp image, the MISTI is a must! For the logs, I first used Distress Ink Pad Old Paper for the solid stamp, then Distress Ink Pad Walnut Stain for the detailed log stamp. For the fire, I lined up the solid stamp to fit into the logs and used Distress Ink Pad Candied Apple then lined up the detail stamp to fit into the red flames using Distress Ink Pad Mustard Seed.

- I love to fussy cut so I cut out all of the pieces. If that’s not your thing, these images can be stamped directly onto the card once you decide where you want to put the fireplace die cut. There is a die to cut out the stocking images. After I fussy cut the pieces, I edged them using a Tsukinek Sponge Dauber and Distress Ink Walnut Stain.
- The ‘framed’ words were created with Lawn Fawn Mini Picture Frames (rectangle shaped die). I cut the scallop rectangle with kraft paper, then stamped the sentiment from the set on white cardstock and cut it out with the rectangle frame die.

- For the background, I cut a piece of white cardstock (4.25” x 5.5”) and dry embossed it with Sizzix 3-D Texture Fades Embossing Folder – Brickwork by Tim Holtz.
- After adhering the fireplace die cut to the embossed background with Bearly Art Precision Craft Glue, I arranged all the images as shown using Scrapbook Adhesive 3D foam strips. These adhesive strips are thin and I could cut small pieces to fit the images. I love to pop things up, but you could certainly glue the images to the card as well.

Author: Kathy Schweinfurth
Supplies Used:
Hero Arts Fireplace Stamp & Cut
Sizzix 3-D Texture Fades Embossing Folder – Brickwork by Tim Holtz
Lawn Fawn Mini Picture Frames
Distress Ink Pad - Walnut Stain
Distress Ink Pad - Candied Apple
Distress Ink Pad - Mustard Seed
Bearly Art Precision Craft Glue
Scrapbook Adhesive 3D foam strips
My Sweet Petunia – MISTI Stamping Tool
Copic Sketch Markers:


