
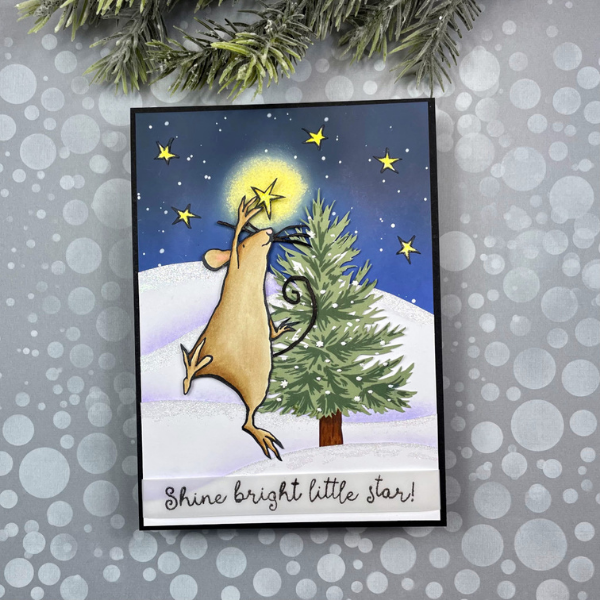
When it comes to crafting, what is your Achilles’ heel? Our weakness is adorable critter stamps and we fell completely in love with the new stamps illustrated by Anita Jeram for Colorado Craft Company. These adorable mice are just too cute for words. When we saw the reaching mouse in the A Star is Born stamp set, we envisioned him trying to place a star on top of a Christmas tree. How perfect for the holidays!

We began by using the dies for the mouse and all the stars and cut them from white cardstock. We find it much easier to diecut first and then align the stamps into the negative space. Then we put the diecuts into the negative spaces and stamped the images using Copic-safe ink (Memento Tuxedo Black).

The first two layers of the tree were stamped with two shades of green. Once the ink was dry, the third layer was stamped using VersaMark and then heat embossed with white embossing powder. Since we were creating an outdoor scene for this card, the tree needed to have a trunk so we used some Copic markers and added one. The tree was fussy cut and set aside.

The mouse and stars were colored with Copic markers. After they were colored, we decided that we didn’t want the images to have the white halo left by the dies, so we carefully cut the halo away using scissors and a craft knife. We then used a black Copic marker to color around the cut edges of each image to hide any remaining white peeking through. This step was definitely tedious and not necessary, but we felt the effort was worth it to get the result we desired.

To create the outdoor scene, we cut two 5” x 7” panels from white 100lb cardstock. One panel was used to free-hand cut four overlapping snow drifts. Shaded Lavender Distress ink was lightly blended onto the front of each snow drift just where another drift overlaps to provide contrast between drifts (the smallest and bottom-most drift has no ink blending on it). A VersaMark ink pad was then swiped along the top edge of each snow section. Glitter embossing powder was added and heat set to add a bit of sparkle to the tops of the snow drifts.

The second 5” x 7” panel was used to create the night sky using Distress Oxide inks. We wanted a bright yellow glow behind the main star so once it was decided where the star would be located, yellow was blended onto the panel first in a small circle. Then Black Soot, Chipped Sapphire and Blueprint Sketch were used to create a smooth, gradient blend from the top of the card to where the snow drifts begin, being very careful to not blend too far into the yellow circle. Once finished, white acrylic paint was splattered onto the sky.

The snow drifts were adhered to the ink blended background panel. The larger star was adhered to the reaching hand of the mouse with liquid glue. The tree and mouse were then adhered in place using a bit of liquid glue at the bottom of each image and foam adhesive squares placed behind the top half of each image to help create dimension. The small extra stars were glued in place with liquid glue. A little shimmer was added to the centers of each star using a Wink of Stella pen.

The sentiment was stamped to a strip of Vellum using a Versafine Onyx ink pad. The stamp was carefully masked in order to get the sentiment stamped onto one single horizontal strip. Once stamped, clear embossing powder was added and heat set to prevent smearing because Versafine is a slow drying ink. Before adhering the sentiment, the card panel was trimmed slightly taking 1/8” from the width and length. The sentiment strip was wrapped around the panel and adhered in place on the back of the panel which was then added to a black piece of cardstock measuring 5” x 7”. The finished panel was then adhered to a side-folding card base measuring 5” x 7” to complete the card.

Crafty Hugs!
Maureen and Michele
Supply List:
Mouse Stamp and Die: Colorado Craft Company – A Star is Born
Tree Stamp: Honey Bee Stamps – Farmhouse Tree Builder
Black Ink: Tsukineko - Memento Tuxedo Black (for colored images)
Tsukineko – Versafine Onyx Black (for sentiment)
Alcohol markers: Copic
Mouse: E42, E31, E55, E35, R21
Dye Ink (for tree): Catherine Pooler – Sage, Spruce
Distress Oxide Ink: Ranger – Squeezed Lemonade, Blueprint Sketch, Chipped Sapphire, Black Soot
Distress Ink: Ranger – Shaded Lilac
Embossing Ink: Tsukineko – VersaMark
Glitter Embossing Powder: Nuvo – Shimmering Pearl
White Embossing Powder: Nuvo – Glacier White
Clear Embossing Powder: Nuvo – Crystal Clear
Liquid Adhesive: Bearly Art - Precision Craft Glue
Foam Adhesive Squares: 3L – 3D Foam Squares (White Variety Pack)
Vellum: Source unknown
Glitter Pen: Wink of Stella – Glitter Clear
Cardstock:
White: Hammermill Premium Cardstock 100 lb
White Card base: Accent Opaque 120 lb
Black: Hero Arts

