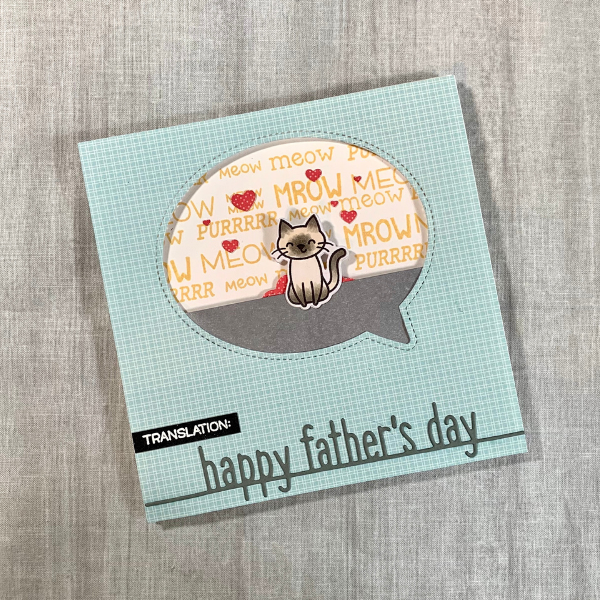
Hey there everyone! It’s Cassie here to share another tutorial, and this time we’ll be making a fun Father’s Day project. If the dad in your life likes to read, then you’re going to love this project.
For your card:
1. Start by trimming down some patterned paper from the Lawn Fawn Hello Sunshine paper pad and a piece of white cardstock to both be 5 ½” x 5 ½”.
2. Use the Outside In Stitched Speech Bubbles die to cut a window in the upper part of your patterned paper.
3. Stamp your sentiments from the Critter Chatter stamp set all over your white cardstock using some Scattered Straw Distress Oxide ink.
4. Die cut the Father’s Day Line Border die from some dark gray cardstock. Adhere that to the bottom of the patterned paper piece with the speech bubble cut from it.
5. Stamp the sentiment that says ‘TRANSLATION:’ onto some black cardstock using some Versamark ink and then cover that with some white embossing powder and heat set that until it is smooth and melted. Trim that down and adhere that above the Father’s Day Border Line die.
For your Bookmark:
1. Stamp your kittens from the Meow You Doin’? stamp set onto some Copic friendly cardstock using some Memento Tuxedo Black ink. Color your images in with your Copic markers, and then die cut them out using the matching dies. Cut out three more of the cats from just the white cardstock. Those will be used for stability so they don’t need to be stamped.
2. Using the Say What? Gift Tags dies, cut out two tags from the same patterned paper pad. Also cut out some stars and hearts using that same die set.
3. Stamp your sentiment onto one of the patterned paper tags. Now adhere the other patterned paper tag to the back of your first tag.
4. Adhere one of your cut and colored kittens to one of the white kitten die cuts. Putting glue just at the bottom back of your kitten, adhere your kitten to the front top of your tag, leaving the very bottom of your kitten unattached.
5. Adhere the other two white kitten die cuts together. Now adhere those to the back of the bookmark.
6. Adhere your stars around your sentiment, and trim off the excess.
Finishing the project:
1. Make a ground for your kitten by sponging some Hickory Smoke Distress Oxide ink onto a rectangular piece of white cardstock. Place that behind your speech bubble.
2. Placing your bookmark in place, turn your piece over so you can start to adhere some foam tape to the back of your card panel. Remove the release paper, and adhere that down to your white cardstock panel.
3. Cut your card base to be 5 ½” x 11” and score it at 5 ½”
4. Stamp your sentiment on the inside of your base, and adhere your other colored and cut kitten to the inside.
5. Adhere your card panel to your card base.
6. Embellish the front with some die cut hearts.
I had so much fun making these bookmark cards, that now I want to make them for all of the book lovers in my family. I sure hope you’ll give it a try, and remember that you can watch the whole process for how I make this card over on the ScrapbookPal.com YouTube channel.
Thanks for stopping by!
Cassie
Products Used:
Lawn Fawn Clear Stamps - Critter Chatter: Pets
Lawn Fawn Clear Stamps - Meow You Doin'
Lawn Fawn Clear Stamps - Reveal Wheel Spring Sentiments
Lawn Fawn Lawn Cuts - Father's Day Line Border
Lawn Fawn Lawn Cuts - Meow You Doin'
Lawn Fawn Lawn Cuts - Outside In Stitched Speech Bubbles
Lawn Fawn Lawn Cuts - Say What? Gift Tags
Lawn Fawn Petite Paper Pack – Hello Sunshine Remix
Scrapbook Adhesives Crafty Foam Tape – White
Tim Holtz Distress Oxide Ink Pad - Scattered Straw
Tim Holtz Distress Oxide Ink Pad - Hickory Smoke
Tsukineko Memento Full Size Dye Inkpad - Tuxedo Black
Copic Sketch Marker - Egg Shell - E50
Copic Sketch Marker - Warm Gray No. 4 - W4


