
- Cut a piece of card stock down to desired size.
- Place your stencil (Altenew) on top of card stock. (if needed, secure with wash tape)
- Apply Deco Foil Transfer Gel Duo to the top of the stencil and spread evenly. Scrape off excess and place back in jar.
- Repeat for any other card stock pieces cut.
- Wash the stencil and tools.
- Set aside to dry for up to one hour or until transfer gel is clear and lightly tacky.
- Die cut flowers (Layered Poinsettia) using the dried paper. Cut as many as desired. (I used 3 per flower)
- Apply the die cut flowers to the Deco Foil shiny side up on both the foil and the flowers.
- Sandwich the foil and flowers in between your cutting plates and run through your die cutting machine.
- If you choose to use heat, sandwich the foil and flowers between copy paper and run through the laminator.
- Peel foil away from flowers. Feel free to use this on a card as well.
- Pinch the edges of the the flower petals. ( 2 large and 1 small)
- Add hot glue to the center of the small and layer on top of a large petal. Press in the center to form a ‘cup’ on the flowers.
- Add hot glue to that stack and layer on top of the last large petal and press in center. Repeat if necessary for as many flowers as needed. Set aside.
- Cut flourish (Fantastic flourish) in coordinating card stock. Trim as necessary. Set aside.
- Stamp your sentiment (Lawn Fawn Jet Black) on vellum paper and cut down to size. (Avery Elle Sentimental, Sentimental Too)
- Use your heat tool to ensure that the ink won’t smear.
- Create an edge border (I used a scallop punch) on the top layer of your card base. (Tonic StudiosCard Blanks)
- Apply a 5 1/2 x 1/2 inch strip of coordinating patterned paper to the inside of the card base on the right. (E-Z Runner Grand)
- Cut a 1 1/4 x 5 1/2 piece of patterned paper and layer on the top of the card - close to the right edge.
- Cut a 1 x 5 1/4 piece of patterned paper and layer onto of that.
- Apply spray adhesive to the flourish and apply at an angel along side the strips of paper. Use another piece of paper to rub on the card to avoid smearing spray adhesive to unwanted parts of the card.
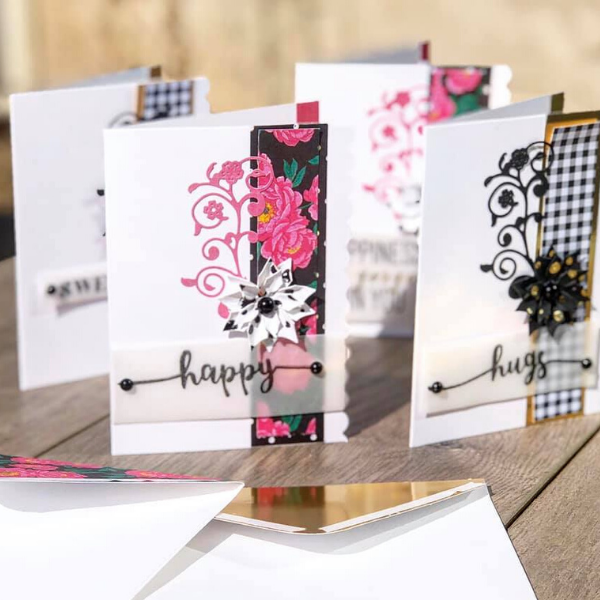
- Add hot glue to the back of the flower and add to the card - center right.
- Add pop dots ( 3D Foam Circles) to the back of the sentiment - one on each end.
- Add a flat back pearl to cover the foam dots on the sentiment and the center of the flower.
- Add coordinating patterned paper to the top flap of the envelope (E-Z Runner Grand) and fussy cut around to finish.
- Add 1/4” tape (Scrappy Tape) around the perimeter of the envelope flap.
- Insert the inside of the card into the envelope.
Products Used:
iCraft Deco Transfer Gel - Duo
iCraft Deco Transfer Sheets - Black
iCraft Deco Transfer Sheets - Gold
Craft Perfect Card Blanks and Envelopes
Avery Elle Clear Stamps - Sentimental
Avery Elle Clear Stamps - Sentimental Too
Spellbinders Shapeabilities Dies D-Lites - Fantastic Flourish One
Spellbinders Shapeabilities Dies - Layered Poinsettia
Altenew Stencil - Tiny Bubbes

