
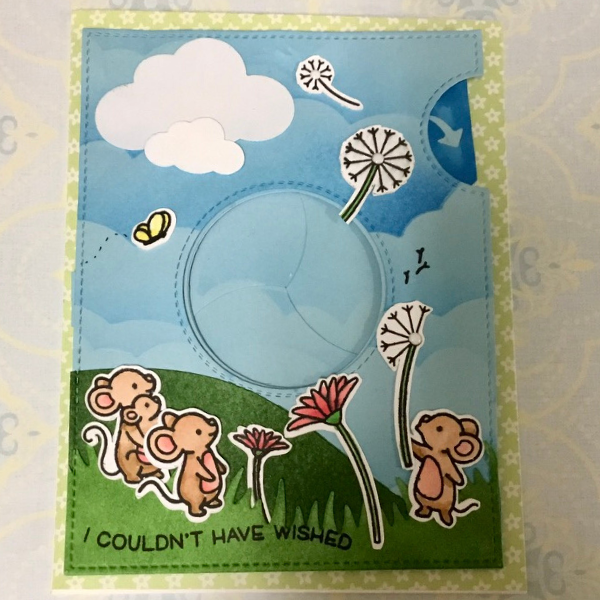
Magic Iris Part 2 Directions:
1 Make Magic Iris (see Tuesday's blog or below for directions).
2. Cut one blue panel with Magic Iris add on and tape circle to it.
3. Stencil clouds onto panel.
4. Stencil clouds onto Magic Iris blades, matching them to the panel.
5. Cut, color, and attach grass to panel.
6. Stamp greeting to front and inside of card.
7. Add Magic Iris to panel.
8. Add panel to A2 card base.
9. Add elements to panel.
Basic Instructions for Forming the Magic Iris
1.Cut 3 rings, 3 stabilizing strips (with the curved ends), 1 rounded tab piece (the arm), 1 rounded tab with the arrow, and 3 blades (sausage shaped pieces). There should be 11 pieces in all.
2.Save one of the small circle pieces from inside the ring for later (or cut a circle from white card stock).
3.Place the slot cutter (whirlygig) inside one of the rings, tape to hold in place, and die cut the three slots. You will also see three stitched markers in the ring.
4.Take one of the blades and slip its tab into one of the slots, making sure the blade aligns along the ring. Do the same to the other two.
5.Each blade has a small x on it. Place a small glue dot over each one.
6.Carefully place another ring atop the blades. Be mindful that the blades stay aligned to the bottom ring. The mini glue dots will hold the top ring in place.
7.Turn the rings over and place tape runner in a straight line from the three stitched markers down to the rim of the circle.
8.Take the three stabilizers and attach them to the back of the ring, aligning them with the arc of the circle.
9.Turn rings over. Attach the rounded arrow tab to the rounded end of the arm.
10.Without turning the ring over, attach the arm to the ring near one of the stabilizing strips. Be sure that the curved edges of the ring and the arm match up and it and the stabilizer forms a small inverted V shape.
11.Place another ring atop the of the Magic Iris. Add adhesive to the three stabilizing strips and fold them over the iris. Do not adhere them tightly because the blades need to move. The strips should not reach the stitching of the inner ring.
12.Check to make sure the iris opens and closes smoothly.
13.Turn the iris over and fold back the blade tabs. Now you are ready to decorate your Magic Iris.
Products Used:
Lawn Fawn Really High Five stamp set
Lawn Fawn Lawn Cuts Really High Five
Glue Dots tape runner
Versafine Onyx Black ink

