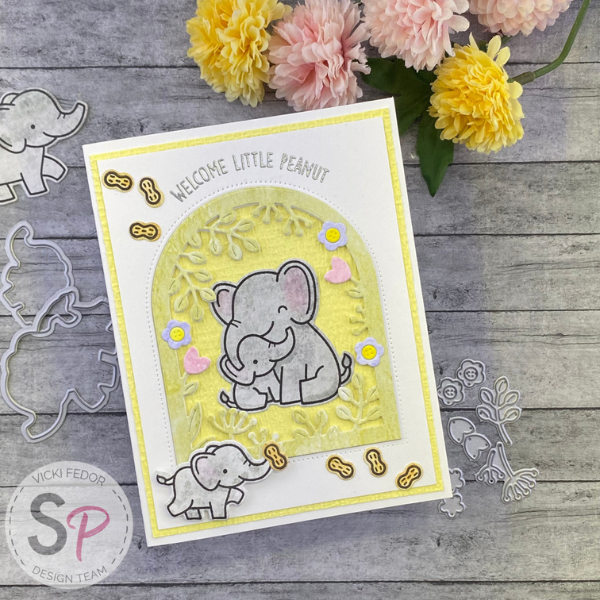
Hello ScrapbookPal friends! Here's a card I made for the ScrapbookPal Design Team using the new Lawn Fawn Secret Garden Window Lawn Cuts Dies, with the Elephant Parade Stamps and coordinating lawn cuts dies. This is my first Lawn Fawn set, and to be honest, I've been shying away from them because I tend not to do cute cards, and my Copic Marker skills... well... they stink! It is a goal for 2023 for me to take some classes on Copic marker coloring. But for now, I decided to do what I do know how to do... I colored watercolor paper with Distress Inks. I even added a bit of shading to the elephants after I stamped them.
To begin, I pulled out a bunch of Distress Ink Pads and colored some watercolor paper. I pressed some ink onto my craft mat, added water, and then picked up the ink on the watercolor paper. I call this the smoosh and spritz technique. I added several layers of ink, and dried between layers. I was pretty sure I wanted a pretty, lighter green like Shabby Shutters for the garden window, and gray (Lost Shadow) for the elephants. I also did some pinks, blues and light purples, because I didn't know in which direction I was going to go.

After the paper was dried, I stamped the elephants on the Lost Shadow paper. I used a little Spun Sugar Distress Ink with a waterbrush to add some soft pink color to the inside of the elephants' ears, and a little Lost Shadow to add some... you guessed it... shadows. I used my Shabby Shutters paper to cut out the Secret Garden Window die. The mama elephant and baby were just so cute... I wanted to use them. I had previously made baby cards for another project, so I didn't want to go with pink and/or blue. Maybe something different... then I saw the teeny tiny peanut stamp and die, and the "Welcome Little Peanut" sentiment. I was thinking about a friend who had just adopted a rescue puppy. Wouldn't this be a cute card to send her? Lots of times I don't really have a plan, I just play around until it comes to me. I grabbed my Distress Ink swatches to see what color looked like a peanut, and settled on Brushed Corduroy, as it was the closest in my mind. Maybe the next (and last?) Distress Ink will be peanut butter colored, and it will be called Extra Crunchy!


I love being able to curve a sentiment on a card. It's really pretty easy, especially with clear stamps like these. I used the top of the garden window as a guide, and gently curved the stamp on an acrylic block until it matched the curve of the design. This can also be done with non-symmetrical shapes, just flip your guide over to the back before you mount the stamp, and always practice on a scrap piece of paper. I inked up the stamp with embossing ink, stamped it on my card front, and embossed with silver embossing powder.

I stamped and die cut a bunch of peanuts. They're so tiny, and simply adorable, especially when you have a pile of them! This was the perfect time to pull out my Sidekick die cutting machine. When I was fiddling with the placement on the card, I decided to add a small elephant outside of the frame. Since the frame is multiple layers, I used small Scrapbook Adhesives foam squares as well as glue to attach it. To give the background a little more interest, I used the Sizzix Tim Holtz Woven embossing folder on a piece of yellow cardstock.

I hope my Welcome Little Peanut card makes you smile, and I hope you'll think about using this design for your own little peanut! All of the supplies are listed below, and available at ScrapbookPal.com!


