
HELLO FRIENDS! I’m Nancy Sheads from Rowhouse Greetings and I’m excited to show you my first project as a new member of the ScrapbookPal.com Design Team. With the winter holidays coming up quickly, I’m always looking for cards that I can easily stamp and assemble. And I think I’ve hit upon a winner with the Nostalgic Season stamp set by Catherine Pooler Designs.
For today’s project, I’m featuring:
- Nostalgic Season - Catherine Pooler Designs
- Nostalgic Season Dies - Catherine Pooler Designs
- Garland Borders - Catherine Pooler Designs
- Spring Fling Mini Ink Pad Set - Catherine Pooler Designs
- Carnivale Mini Ink Pad Set - Catherine Pooler Designs
- Additional supplies listed below.

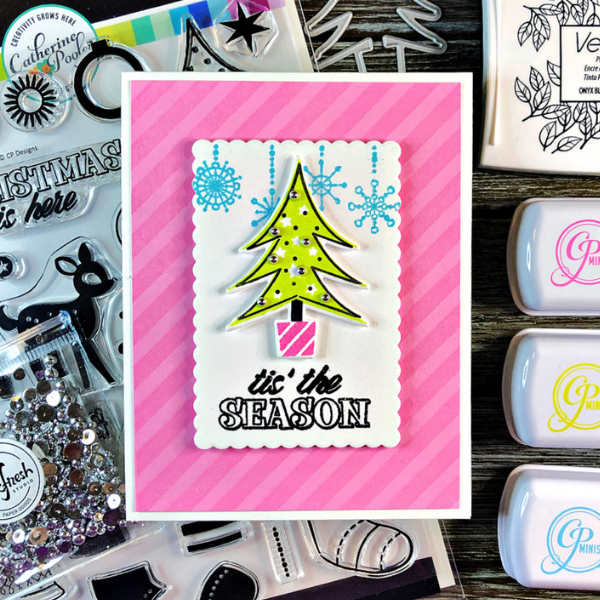
I started by trimming a piece of white cardstock with one of the medium sized dies in the Scallop Rectangle Stackables die set by Lawn Fawn. Across the top, I stamped the snowflake garland from the Garland Borders stamp set by Catherine Pooler Designs using the “It’s A Boy” ink pad in the Spring Fling Mini Ink Pad Set. Along the bottom, I stamped one of the sentiments from the Nostalgic Season stamp set with Versafine Ink in Onyx Black. I quickly covered the sentiment with Crystal Clear Nuvo Embossing Powder and heat set the powder.

For the central image, I chose the Christmas tree from the Nostalgic Season stamp set. I stamped the outline and the tree trunk with Versafine Ink in Onyx Black. I stamped the solid tree background with “Melon Ice” from the Spring Fling Mini Ink Pad Set and the pot with “Be Mine” from the Carnivale Mini Ink Pad Set. I trimmed the tree image using the coordinating die from the Nostalgic Season die set.

I knew that I wanted a subtle background so I selected a pink cardstock that matched the ink used on the tree. I inked up the Pop Out Diagonal Stripes stamp set by PinkFresh Studio with Versamark Ink, stamped it on pink cardstock, and allowed it to dry without embossing. This created a tone on tone pattern for the background. To be honest, my first attempt at the background did include heat embossing with clear embossing powder, but I found that the shininess in the background distracted from the central image so I set that background aside for another project.

All that’s left is assembling the layers! I adhered the pink cardstock to the card base using Beacon’s 3-in-1 Advanced Craft Glue. This glue is a personal favorite and I use it on all of my cards since it’s easy to apply and holds better (at least for me) than tape. I applied 3D Foam Small Squares on the back of the tree and Crafty Foam Tape on the back of the white card stock to add dimension. Then I applied Silver Metallic Pearls randomly on the tree for added shine and whimsy.
Let’s take another look at the finished card!
That’s all for me today! Hope you enjoyed today’s project!
Nancy
Supply List:
- Nostalgic Season - Catherine Pooler Designs
- Nostalgic Season Dies - Catherine Pooler Designs
- Garland Borders - Catherine Pooler Designs
- Pop Out Diagonal Stripes - PinkFresh Studio
- Spring Fling Mini Ink Pad Set - Catherine Pooler Designs
- Carnivale Mini Ink Pad Set - Catherine Pooler Designs
- Versamark Watermark Stamp Pad - Tsukineko
- Versafine Ink Pad - Onyx Black - Tsukineko
- Nuvo Embossing Powder - Crystal Clear
- Scallop Rectangle Stackables - Lawn Fawn
- Metallic Pearls - Silver - PinkFresh Studio
- 3D Foam Small Squares - White - Scrapbook Adhesives
- Crafty Foam Tape - White - Scrapbook Adhesives
- 3-in-1 Advanced Craft Glue - Beacon Adhesives

