
Hello friends! Michele and Maureen from KreativeKinship to share a pretty and feminine card featuring some gorgeous new products from Pinkfresh Studio. Let's jump right in!

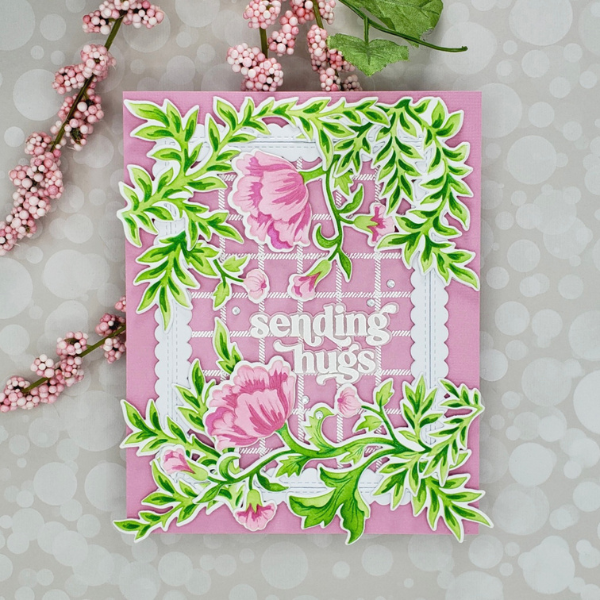
When we saw the new Blooming Vines stamp, die, and coloring stencils, we envisioned a pretty card having tons of texture with the beautiful flowers & foliage taking center stage. We wanted a no-line look, so we lightly stamped the image twice on 2 panels of white cardstock using Tim Holtz Distress Ink in Pumice Stone. We then applied color using the layered stencil set and Distress Inks in a variety of pinks for the flower layers and greens for the vines.

We gave our stenciled panels a few minutes to dry, then cut all the images out using the coordinating one-piece die. The images were then set aside while we worked on the background.

We wanted the background to look light and airy, so we used a fine-line plaid stamp and pink cardstock to create our panel. We stamped the image with VersaMark ink, added white embossing powder, and then heat set to give us the look we wanted. The background panel was cut down to approximately 3 3/4” x 5” and set aside.

To frame our background and ground the foliage, we cut a stitched scalloped frame die 3 times with 120 lb white cardstock. The layers were stacked and adhered together with liquid glue to create a sturdy, dimensional frame.

We stamped the sentiment with VersaMark ink on vellum and used the same white embossing powder. The sentiment was cut out with the coordinating die.

To assemble the card, the scalloped frame was adhered atop the plaid embossed background and the entire element was adhered to a 6 1/4” x 5” panel of pink cardstock. We fussed with the florals and vines until we were happy with the placement, leaving room to adhere the sentiment. All the elements were adhered directly to the frame and plaid panel with a combination of liquid glue and foam squares to keep everything sturdy and to give the elements dimension. The die cut sentiment was also popped up directly on the background panel using foam squares cut into thin strips to hide the adhesive behind the letters so it wouldn't show through the vellum.

To finish the card, a few tiny clear gem stickers were added for a bit of sparkle.

We hope our card has inspired you to get crafty and create whatever brings you joy!

Crafty hugs!
Michele and Maureen
Supply List
Stamp, die and coordinating stencils: Pinkfresh Studio – Blooming Vines
Scalloped frame: Pinkfresh Studio – Stitched Scalloped Rectangle
Background stamp: Honey Bee Stamps – Farmhouse Check Background
Sentiment & coordinating die: Pinkfresh Studio – Perfect Sentiments
Stamping Tool: My Sweet Petunia - Misti
Distress Ink: Ranger – Pumice Stone, Spun Sugar, Picked Raspberry, Twisted Citron, Mowed Lawn
Liquid Adhesive: Bearly Art - Precision Craft Glue
Foam Adhesive Squares: 3L – Thin 3D Foam Squares (White Variety Pack)
Embossing Ink: Tsukineko – VersaMark
Embossing Powder: Tonic NUVO – Glacier White
Gem Stickers: Honey Bee Stamps – Clear Gem Stickers
Pink Cardstock
White Cardstock (Stamped/stenciled flowers & vines): Accent Opaque 80 lb
White Card base and scalloped frame: Accent Opaque 120 lb

