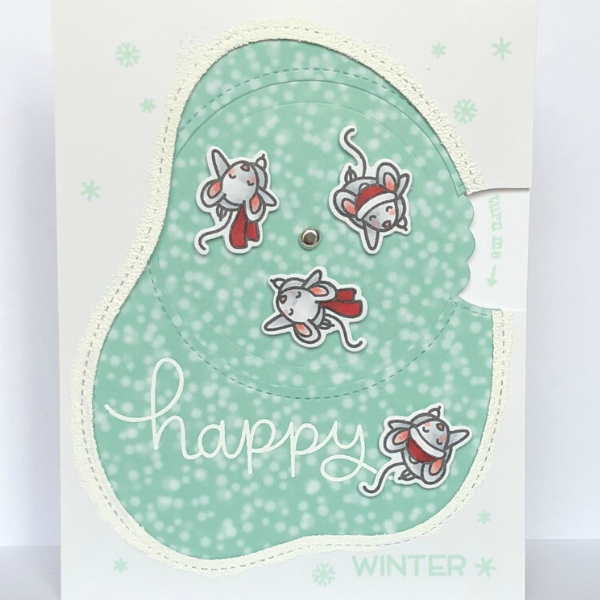
Instructions -
Create the Mice:
- 1. Stamp the Lawn Fawn (LF) aerial view mice two times each with LF Jet Black ink.
- 2. Cut out the mice using the coordinating dies and a die cutting machine.
- 3. Color the mice with Copic markers.
Create the Modified Reveal Wheel Panel:
- 1. Die cut two reveal wheel panels with the reveal wheel panel die: one in white for the bottom panel, and one the color or pattern paper chosen to represent the ice.
- 2. Die cut one wheel in the same color or pattern as the ice reveal wheel panel.
- 3. Line up the wheel on the ice reveal wheel panel to determine where to die cut a circle. Make a mark through the center hole of the wheel to help measure the placement of the circle.
- 4. Die cut a circle out of the ice reveal wheel panel that is slightly smaller than the wheel.
Create a Pond Border Top:
- 1. Create a template by die cutting the reveal wheel panel in the center of a piece of 4 ¼ x 5 ½” cardstock.
- 2. Cut a 4 ¼ x 5 ½” white cardstock panel.
- 3. Overlay the template and the ice reveal wheel panel onto the white cardstock panel.
- 4. Line up the LF Stitched Pond die inside the borders of the template, making sure the circle opening of the ice reveal wheel panel is fully visible.
- 5. Die cut the white cardstock panel with the LF Stitched Pond. This is now the pond border top panel of the card.
Create the Greeting:
- 1. Line up the pond border panel over the ice reveal wheel panel to determine where to stamp the sentiment “happy” on the ice reveal wheel panel.
- 2. Prepare the area with an anti-static powder tool, stamp in LF clear ink, sprinkle LF white embossing powder on the stamped area, and melt the powder with a heat tool.
- 3. Stamp the word “winter” onto the lower right corner of the pond border panel with LF Minty Fresh ink.
- 4. Stamp snowflakes, also from the Mice on Ice stamp set, all around the pond border panel with LF Minty Fresh ink.
Assemble the Reveal Wheel:
- 1. Die cut the smallest circle from the Reveal Wheel die set.
- 2. Adhere foam squares to one side of the small circle. Important: Do not take off the liner paper on the exposed side of the foam squares.
- 3. Place a brad through the top of the ice wheel, through the smaller circle, sandwiching the foam squares in between.
- 4. On the back of the small circle, open the prongs to secure the brad and add strong adhesive.
- 5. Line up the wheel (now attached to the small circle) between the ice reveal wheel panel and bottom reveal wheel panel and adhere the small circle to the bottom reveal wheel panel.
- 6. Add foam adhesive to the bottom reveal wheel panel, covering the panel, but making sure it does not touch the wheel.
- 7. Adhere the ice reveal wheel panel to the bottom reveal wheel panel.
Create the Modified Wheel Notch:
- 1. Using the template once again, determine where to cut out the opening for the turning notch and cut out using scissors.
- 2. Line up the notch area onto a 4 ¼ x 5 ½” note card to determine where to stamp “turn me” and stamp it directly onto the note card.
Create a Snowy Edge Around the Pond:
- 1. On the pond border panel, add clear ink using a LF embossing pen all around the edges of the pond.
- 2. Sprinkle LF Textured White embossing powder all around the edges and melt with a heat tool.
Assemble all Elements Together:
- 1. Line up and attach the mice with foam adhesive onto the ice pond and wheel.
- 2. Adhere the reveal wheel back panel to the note card.
- 3. Add foam adhesive onto the note card all around the reveal wheel panel.
- 4. Attach the pond border panel over the reveal wheel panel onto the note card.
Instagram: @karalynn88
Products Used:
Lawn Fawn Clear Stamps - Mice on Ice - LF2031
Lawn Fawn Lawn Cuts - Mice on Ice - LF2032
Lawn Fawn Clear Stamps - You’re Just My Type - LF2165
Lawn Fawn Lawn Cuts - Stitched Pond - LF2067
Lawn Fawn Lawn Cuts - Outside In Stitched Circle Stackables - LF1441
Lawn Fawn Lawn Cuts - Reveal Wheel - LF1703
Lawn Fawn - Acrylic Block 1.75" Round with 8 Grips - LF496
Lawn Fawn Lawn Inks - Jet Black - LF1302
Lawn Fawn Lawn Inks - Minty Fresh - LF1392
Lawn Fawn Lawn Inks - Ice Cream Parlor Ink Cube Pack - LF1531
Lawn Fawn Lawn Inks - Clear for Embossing - LF1811
Lawn Fawn - Embossing Ink Pen - LF1812
Lawn Fawn Embossing Powder - White - LF1537
Lawn Fawn Embossing Powder - Textured White - LF1813
Lawn Fawn Petite Paper Pack - Snow Day Remix - LF2083
Lawn Fawn Stamp Shammy - LF1045
Lawn Fawn Starry Stamp Shammy Case - LF2095
EK Success Cutter Bee Scissors - EKCB01
Mini Brads 3mm - Silver, 100 pk - CI92001
Ranger Anti-Static Pouch - INK62332
MISTI Stamping Tool - Original - MISTI
Scrapbook Adhesives 3D Foam Creative Sheets Small - White, 2 pk - 1228
Scrappy Tape 1/4" x 30 yds - ST14
Tombow Double-Sided 3D Foam Tape - 62137
Tombow Mono Dots Adhesive Dispenser - Permanent, 39 ft - 62147
Tombow Mono Dots Adhesive Refill - Permanent, 3pk - 62149
Sizzix Big Shot Machine - White & Gray - 660425
Copic Sketch Marker - Cool Gray No. 00 - C00
Copic Sketch Marker - Cool Gray No. 2 - C2
Copic Sketch Marker - Garnet - R39
Copic Sketch Marker - Light Prawn - R22


