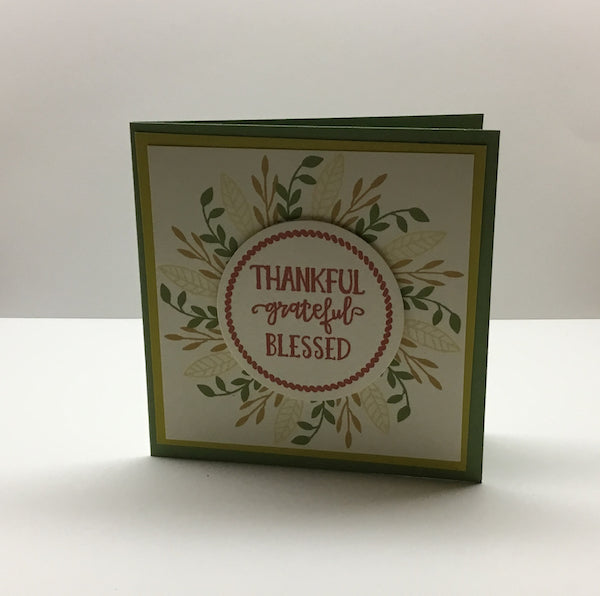
Learn how to make 6 different cards using the Gina K. Designs Wreath Builder Template and the Gina K. Designs Stamps - Autumn Wreath Builder. You can use these techniques with any of the other Gina K. Designs Wreath Builder Stamps as well.
General Directions
1. Place either 3 3/4” or 4” Wreath Builder Template in your MISTI.
2. Place your square cardstock in the template.
3. Place your stamp in the desired position on the cardstock near corner 1 on the template (mark your cardstock in the top corner with an x if desired).
4. Ink the stamp and close the MISTI to press the stamp onto the cardstock.
5. Move the cardstock to corner 2, ink and press the stamp onto the cardstock.
6. Repeat until the stamp has been stamped in each of the eight corners.
7. Return the cardstock to position 1 and choose another stamp.
8. Repeat steps four through six until you have completed the wreath.
9. Decorate the center of the wreath with a greeting.
Thankful, Grateful, Blessed Wreath Card:
1. Follow the general directions 1 through 8 using the 3 3/4” Wreath Builder Template.
2. Pat the anti static pouch on a scrap piece of cardstock.
3. Ink and stamp the rope circle on the cardstock.
4. Using the embossing ink, stamp the rope circle again.
5. Heat the circle with the heat gun.
6. Repeat steps 2 through 4 for the Thankful, Grateful, Blessed stamp.
7. Cut out the circle with an appropriate size die.
8. Using foam adhesives, attach the circle to the center of the wreath.
9. Adhere the panel to a 4x4” colored back panel.
10. Adhere them to a 4 1/4” square card base.
Thanks So Very Much (leaf) Wreath Card:
1. Follow the general directions 1 through 3 using the 4” template.
2. Ink the stamp with one color and sponge it gently with another ink before stamping.
3. Repeat for 8 rotations.
4. Return to position 1 and place the stamp above the previously stamped image.
5. Ink and stamp as before for 8 rotations.
6. Place the maple leaf in position one and repeat the steps.
7. In the center of the wreath, stamp Thanks So Very Much with black ink.
Wreath Card 3 3/4” x 5” (Rectangular Card)
1. Follow steps 1 through 8 of the general directions using 3 3/4” template.
2. In the bottom center of the wreath, stamp the flower and left stem, purple for the flower and green for the leaves.
3. Stamp the circle into the center of the wreath.
4. Stamp Eat, Drink, And Be Thankful greeting.
5. Cut out the circle with the appropriate size circle die.
6. Adhere the circle to the wreath with foam squares.
7. Layer panel to a back panel, 4”x 5 1/4”.
8. Adhere to 4 1/4’ X 5 1/2” card base.
So Grateful for You Card
1. Use 4” wreath template.
2. Place stamp in position 1 and stamp.
3. Rotate to positions 2 and 3 and stamp.
4. Rotate to position 8 and stamp.
5. Place the next stamp and stamp in positions 1, 2, and 8.
6. The final leaf is stamped in positions 1, 2, 3, and 8.
7. Turn the panel so that the leaf design is on the left.
8. Stamp So Grateful for You to the right of the leaves.
9. Layer with a 4 1/4” background panel.
10. Adhere to a 4” x 4” card base.
Thanksgiving Blessing Layered Wreath Card
1. Use the 4” template.
2. Cut a 4” square, a 3” square and a 2” square of cardstock.
3. Adhere them together with a repositionable adhesive.
4. Cut colored cardstock squares, 4 1/4”, 3 1/4”, and 2 1/4” and set aside.
5. Stamp the Thanksgiving blessings sentiment on the 2” square.
6. Place a stamp in position 1, ink and stamp.
7. Rotate cardstock and stamp in positions 3, 5, and 7 only.
8. Return to position 1 and repeat with as many stamps as desired (I used 5 stamps).
9. Ungroup the panels and adhere to corresponding colored layers.
10. Adhere the largest layer to the card base.
11. Adhere the next layers making sure they line up to keep the leaf shapes intact.
12. Adhere to a 5” square card base.
Congrats Wreath
1. Use the general directions 1 through 6 using the 3 3/4” template.
2. Using Nuvo Crystal Drops, put three sets of berries in eight different positions.
3. Set aside to dry.
4. Die cut three congrats dies and adhere together.
5. Adhere congrats die in center of wreath.
6. Attach the panel to a 4” square colored panel using a tape runner.
7. Attach them to a 4 1/4” square card base.
Products Used:
Gina K. Designs Stamps - Autumn Wreath Builder
Gina K. Designs Wreath Builder Template
Gina K. Designs Ink Cube Assortment - Autumn
Gina K. Designs Amalgam Ink Pad - Jet Black
Tim Holtz Distress Ink Pad - Clear for Embossing
Lawn Fawn Embossing Powder - Clear
Glue Dots Removable Squares Dispenser Non-Refillable
Glue Dots Tape Runner - Permanent, 72 ft
Scrapbook Adhesives 3D Permanent Foam Squares - White 1/4" x 1/4", 308 pk
Zig 2-Way Glue - Squeeze Roll
Lawn Fawn - Lawn Cuts - Scripty Congrats
MISTI Stamping Tool - Original
Tombow Mono Sand and Rubber Eraser
Nuvo Crystal Drops Gloss - Ripened Pumpkin
Cardstock from my stash


