

Hello ScrapbookPal friends! Welcome to my first project as a member of the ScrapbookPal Design Team! I'm so happy to be here! I wanted to make sure that my first project was happy and fun! My go-to happy and fun festive color combination is Tim Holtz's Distress Oxides in Picked Raspberry and Twisted Citron. I'm using Catherine Pooler's Jolly Holly Stamp Set, the coordinating Jolly Holly Dies, and the Holly Jolly Layered Word Die.
I started by stamping two of each of the different sized holly leaves, using my Misti Stamp Positioner. After stamping the background in Twisted Citron twice to get a nice solid image, I stamped over it with Mowed Lawn, using the different geometric patterns that come with this stamp set. After I die cut my holly leaves, I stamped the berries on the leftover white cardstock in Picked Raspberry. I decided to embossed the berries with Lawn Fawn clear embossing powder. The Distress Oxide inks will stay wet long enough for you to apply embossing powder, and then heat emboss using the heat tool of your choice.
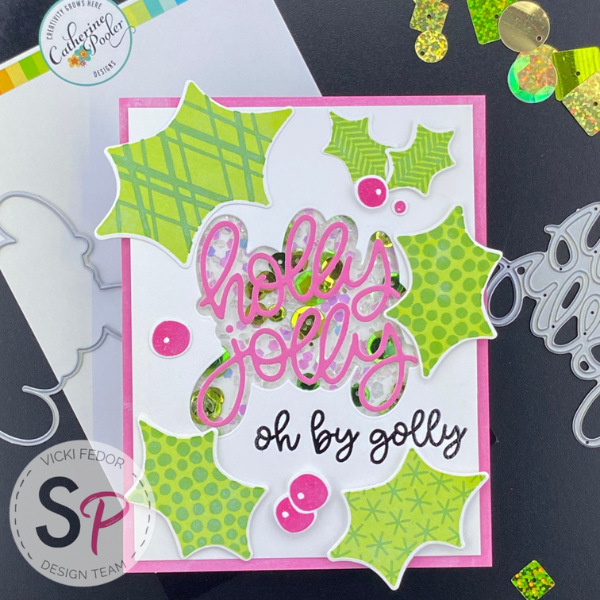
I knew I wanted the Holly Jolly sentiment to be the focal point of the card. This die set comes with the word die as well as a shadow die. I thought it would be fun to use the shadow die to cut a hole in the card front, and place a shaker pane behind it. I decided to make a flat shaker pane so it would be easier to mail this card. I tend to mail out quite a few cards for Christmas, and I like to try to keep most of them within the dimension specifications for a regular postage stamp.

I measured the shadow of the word die set, and cut out a piece of cardstock that would fit behind it as the shaker pane. This was about 3 inches square. Next I took a piece of the acetate packaging, and cut a piece that was 4 inches square. I laid the cardstock in the center of the acetate, and folded up the sides of the acetate over the cardstock, creasing the folds with a bone folder. I applied double sided tape around the edges of the cardstock, snipped off the corners of the acetate (see photo above), and then attached the acetate to the cardstock on three sides only, leaving one side open. This creates an envelope to hold the shakety bits!

Fill the envelope with as much as you want, using sequins, glitter, or even shaker fillers that are available. When you're happy with the look (give it a good shake to try it out) close up the last side.

Next, I blended Picked Raspberry oxide ink over another piece of cardstock, and die cut my sentiment. When I had all of my pieces done, I was ready to figure out my layout. I just had to use the "oh by golly" sentiment that came with the stamp set! It's so adorable! I went ahead and die cut the shadow die (that's where the shaker pane will go) so I knew where to stamp the sentiment "oh by golly". I stamped this in Ranger Archival Jet Black Ink, and again embossed using clear embossing powder.
To finish off the card, I taped the shaker pane in place, and then attached the holly leaves and berries to my card using Bearly Art's Glue, and two different thicknesses of Scrapbook Adhesive's Foam Mounting Squares. I absolutely love these mounting squares! They come in two different sizes, and two different thicknesses, regular and thin mounting squares. They also come in both white and black. They stick like nobody's business, and they're so convenient. I always have a backup supply. I've tried others, and they just don't compare. Since the shaker pane is kind of flat, I wanted to add dimension to the card by using the two different thicknesses of foam squares, as well as just gluing some elements down flat.

I decided to leave the leaves hanging off the side of the card because I thought it was more playful. If I need to mail it, I'll just use a larger envelope. You can of course trim yours if you prefer. I used Distress Collage Medium to glue the pink sentiment to the acetate of the shaker pane just to be sure it would stick. For one more pop of color, I added a Picked Raspberry ink blended panel behind my card front, and then secured that to an A2 card base using double sided adhesive tape.
While I had everything out and strewn all over my craft room, I made one more card in the same style, but I optimized the process for bulk card making! This card doesn't have a shaker pane, but I used a few sequins for sparkle. The holly leaves and berries are stamped directly onto the card front, and only the sentiment is embossed. I had some bright pink paper in my stash that I used for the "holly jolly" die cut, and popped that up using two more layers of white cardstock that I diecut from scraps. I made 12 cards of this design fairly quickly, to add to my stock of cards ready to send out for the holidays!

I hope you enjoyed this card, and I hope that you replicate either of the designs for your own Christmas cards!
Products used in this project, available at ScrapbookPal.com:
Catherine Pooler Jolly Holly Stamp Set
Catherine Pooler Jolly Holly Dies
Catherine Pooler Holly Jolly Layered Word Die
Tim Holtz Distress Oxide Ink Pad - Twisted Citron
Tim Holtz Distress Oxide Ink Pad - Mowed Lawn
Tim Holtz Distress Oxide Ink Pad - Picked Raspberry
Tim Holtz Collage Medium
Ranger Archival Ink Pad - Jet Black
Bearly Art Precision Craft Glue - The Bundle (with precision tip)
Scrapbook Adhesives 3D Foam Squares White Variety Pack
Scrapbook Adhesives 3D Foam Squares White Variety Pack - Thin
Scor-Pal Scor-Tape 1/4"
Lawn Fawn Embossing Powder Clear
Misti Stamping Tool - Original
Ranger Ink - Mini Ink Blending Tool


Comment
Love the card so I had to purchase the stamp set.