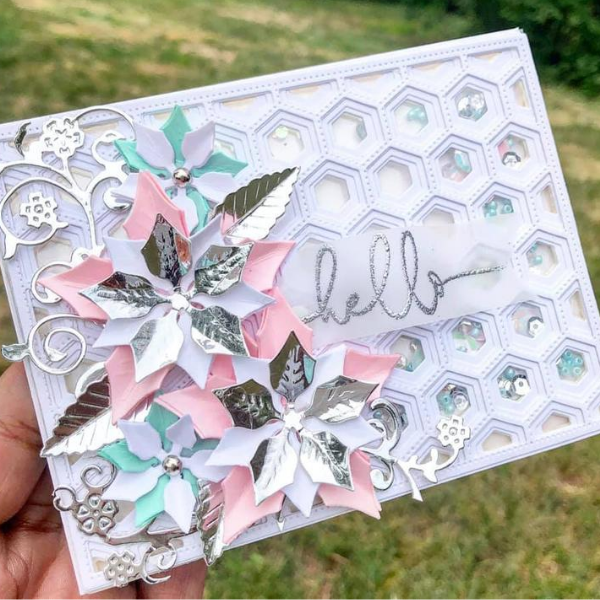
Instructions:
1) Using your card base, add card stock to the inside bottom. This should be cut down to 4 1/8 x 5 3/8. This will help to add weight to the card.
2) Cut down two pieces of acetate a little larger than your card base. We will cut off the extra later.
3) Cut one each of the honeybee hexagon cover plate layers in white card stock.
4) Grabbing the base layer die, cut at least six pieces in card stock. This will be the shaker component.
5) Once you have the six pieces cut, stack them all together neatly. Being careful to keep them in the same position. Cut out a middle portion of your stack. This is where the shaker bits will go. An alternative option is to use a rectangle die to cut out all the pieces. Make sure everything is lined up accordingly.
6) Using your poinsettia die, cut out the second to the largest flower four times. (Pink) Going down one flower size cut four pieces out in one color(white) and two pieces in another color (silver). Going down to the final smallest size, cut four pieces out in one color (white) and four pieces out in another color (mint).
7) Using your decorative flourish, cut out one piece (metallic silver).
8) Using the leaves from the Cinch and Go 4, cut three of the smallest leaves in card stock(silver).
9) Using the single previously cut base layer (step 3-white card stock), attach that to one of the acetate pieces and set aside to dry.
10) Using clear wet glue, attach the six base layers that you cut the middle from. Stack them evenly and carefully. When the stack has been completed, use the last acetate piece and attached to the back. Set aside to dry under something flat and heavy.
11) Attach the rest of the three layers (part 3) Using clear wet glue.
12) To make the flowers, they first need to be put together in clusters. Starting with the largest petals stack two of them together. You should have two sets of large flowers, two sets of the medium flowers, four sets of the small flowers. There should be two single medium flowers left, three leaves and the flourish.
13) Take each of your flower stacks individually and bend the petals inward.
14) Stack together one large flower cluster, one medium flower cluster and one silver single petal. Repeat this another time.
15) Add a 3-D foam dot to the back.
16) Stack your two remaining clusters together. They are both the same size just a different color. You should now have four flower clusters.
17) Feel free to add silver fasteners to the inside of the last 2/smallest flower clusters.
18) Bend your three petal leaves inward, just as you did the flower petals.
19) Using your stamp set, stamp hello onto a piece of vellum with some clear embossing ink. Emboss with silver embossing powder and cut into a page flag.
20) Grab your two pieces with the acetate, cut off the excess around the perimeter of both.
21) Add your shaker mix to the center of the base. Add wet glue to the perimeter and add the top to the base. Set aside to dry, apply something heavy on top.
22) Cut down your flourish so you can have a piece at the top left corner. The flourish will be eventually broken down into three parts to fill up tuck spots.
23) Starting with your largest flower center that to the left middle of the card. Use hot glue to secure. At an angle add the second large flower. Tuck the two smaller flowers at the open spaces opposite the flowers.
24) Use another piece of the flourish to tuck in the bottom left and the bottom middle. Fill in any open spaces that you see.
25) Add a small dimensional to the left of your sentiment. Apply to the card.
Products Used:
Honey Bee Stamps - Honey Cuts - Hexagon Cover Plate – Middle
Honey Bee Stamps - Honey Cuts - Hexagon Cover Plate – Base
Honey Bee Stamps - Honey Cuts - Hexagon Cover Plate – Top
Honey Bee Stamps - Honey Cuts - Hexagon Cover Plate – Stipple
Lawn Fawn Acetate
Spellbinders Shapeabilities Dies D-Lites - Fantastic Flourish One
Spellbinders Shapeabilities Dies - Layered Poinsettia
Cinch and Go IV
Avery Elle Clear Stamps - Floating Wishes
Scrapbook Adhesives E-Z Runner Dispenser Combo Pack
Scrapbook Adhesives 3D Foam Circles - White Mix
Craft Perfect - Card Blanks & Envelopes - Bright White, 10 pk


