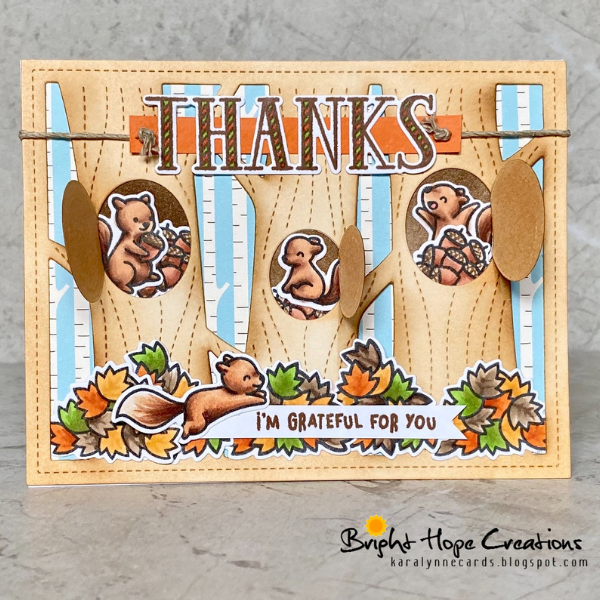
These squirrels are happy to share an abundance of appreciation with a thank you card! This blog and video features stamping, die cutting, Copic coloring, and assembling a lift the flap thank you card.
Create the Front Panel:
1. Die cut a piece of white cardstock with Lawn Fawn’s Lift the Flap Tree Backdrop.
2. Ink blend the trees using Picket Fence Studios blender brushes and Tea Dye and Gathered Twigs Distress Inks.
3. Cut a piece of patterned paper from Lawn Fawn’s Into the Woods Remix to 4.25”x5.5”.
Stamp and color the images:
1. In the MISTI, position four of the squirrels, acorn and leaf pile images from Lawn Fawn’s Let’s Go Nuts on
white cardstock.
2. Shut the door of the MISTI to pick up the stamps.
3. Ink them with Copic friendly ink (Lawn Fawn Jet Black).
4. Shut the door of the MISTI to apply the ink to the paper.
5. Color the images with Copic Markers.
6. Cut out the images using the coordinating Lawn Cuts.
7. Stamp, color, and cut out two extra acorn piles and four extra leaf piles.
Create a Background for the Lift the Flap Trees:
1. Ink blend Ground Espresso Distress Ink onto white cardstock.
2. Cut pieces of the inked cardstock to fit behind each tree, covering the opening.
3. Position and glue the squirrels and acorn piles onto the background pieces.
4. Glue the backgrounds to the back of the trees.
Create the Sentiment:
1. Stamp the largest “Thanks” word from Lawn Fawn’s Thanks Thanks Thanks onto white cardstock with LawnFawn’s Walnut ink.
2. Stamp the sentiment, “I’m grateful for you” from Lawn Fawn’s Let’s Go Nuts onto white cardstock with LawnFawn’s Walnut ink.
3. Cut out the “Thanks” using the coordinating Lawn Cuts, and cut the other sentiment into a .25” strip.
4. Color the “Thanks” with Copic markers.
5. Cut a strip of orange cardstock .5” longer than the “Thanks” .
6. Punch small holes on both ends of the orange cardstock using a craft pick.
7. Thread hemp cord through the holes and tie a knot in each one on the front of the orange strip.
8. Cut the hemp cord leaving enough string to tuck behind the front panel.
Complete the card:
1. Adhere the Tree Backdrop to the patterned paper using Lawn Fawn’s Glue Tube.
2. Position and glue the leaf piles at the bottom of the Tree Backdrop.
3. Glue the sentiment strip and one squirrel on top of the leaves.
4. Attach the hemp cord to the back of the panel using Scrappy tape.
5. Add Scrappy tape to the back of the panel and attach it to a 4.25”x5.5” notecard.
Video:
Products Used:
Lawn Fawn Stamps – Let’s Go Nuts
Lawn Fawn Stamps – Thanks Thanks Thanks
Lawn Fawn Lawn Cuts – Let’s Go Nuts
Lawn Fawn Lawn Cuts – Thanks Thanks Thanks
Lawn Fawn Lawn Cuts – Lift the Flap Tree Backdrop
Lawn Fawn 6x6 Paper Pack – Into the Woods Remix
EK Success Cutter Bee Scissors
Lawn Fawn Lawn Inks - Candy Store Ink Cube Pack
Lawn Fawn Lawn Inks - Jet Black
Lawn Fawn Lawn Inks - Walnut
Lawn Fawn Starry Stamp Shammy Case
MISTI Stamping Tool - Original
Picket Fence Studios Life Changing Blender Brush Set - 10 pk
Picket Fence Studios Life Changing Blender Brush Set - Broad Application, 4 pk
Picket Fence Studios Life Changing Blender Brush Set - Fine Blending Assortment, 6 pk
Tim Holtz Distress Ink Pad - Gathered Twigs
Tim Holtz Distress Ink Pad - Ground Espresso
Tim Holtz Distress Ink Pad - Tea Dye
Tonic Studios Tim Holtz Retractable Craft Pick / Paper Piercer


