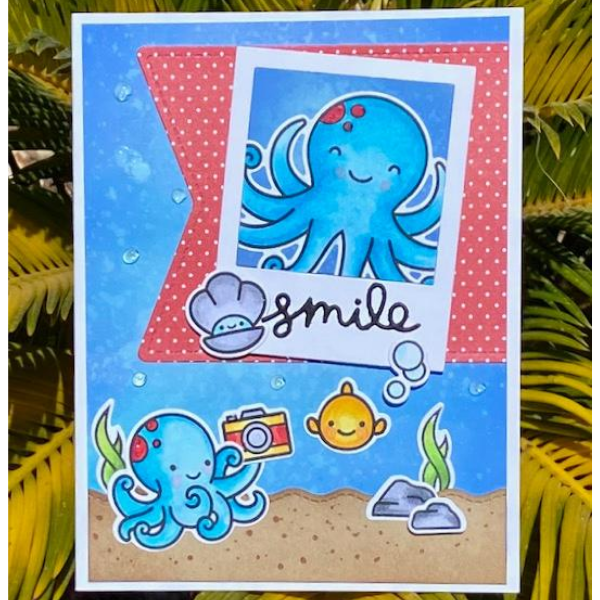
Instructions:
1. Stamp the sentiment “you take the best shell-fies” on the inside of the card using Lawn Fawn Jet Black ink
2. Trim two panels of white cardstock and use Distress Oxide Broken China and beginning blending in the center of the panel . ( 4-1/2 x 6 and a smaller one to measure 2-1/2x3)
3. Continue blending with Distress Oxide Salty Ocean and then use Blueprint Sketch until you have achieved the look you want. (On the smaller panel you only need to do a small section in the center.)
4. Add water sprays and set the panels aside to dry.
5. Using the stitched simple wavy border die cut a piece of Kraft cardstock. Add some distress ink in vintage photo along the top edge of the border. (see video for more details)
6. Trim the larger ink blended panel to measure 4x5-1/4 inches. Add this panel to the front of the card centering the panel on the front.
7. Trim the Kraft wavy border to measure 4 inches wide and adhere it to the bottom of the card leaving an even border.
8. Stamp, color, and die cut the images from the Ocean Shell-fie set.
9. Use the smaller stitched party banner die and cut a piece of red polka dot paper. Trim off the holes on the banner and attach the banner to the upper right hand side. (see photo or video for placement)
10. Die cut the smaller ink blended piece using the frame from the selfie frames die set.
11. Keep the center panel which is ink blended to match the larger panel.
12. Die cut a second frame from white cardstock.
13. Glue the larger Octopus onto the ink blended square and trim off the excess.
14. Place the Octopus in the white frame, flip the frame over and add foam tape to the back. (see video for more details)
15. Remove the backing and attach the frame to the red banner as shown.
16. Die cut the word “smile” from the selfie frame set and adhere to the bottom of the white frame. (see photo for placement)
17. Use Light Walnut Copic marker and add small dots to the Kraft border for more texture.
18. Adhere the remaining images as shown in the photo.
19. On the inside of the card add the small fish to the left of the sentiment.
20. Use the Lawn Fawn glitter pen and add some sparkle to the images as desired.
21. Take the Morning Dew Nuvo Crystal drops and add to the ink blended panel.
Video:
Products Used:
Lawn Fawn Clear Stamps - Ocean Shell-fie
Lawn Fawn Lawn Cuts - Ocean Shell-fie
Lawn Fawn Lawn Cuts - Stitched Party Banners
Lawn Fawn Lawn Cuts - Selfie Frames
Lawn Fawn Lawn Cuts - Stitched Simple Wavy Borders
Lawn Fawn Glitter Pen
Lawn Fawn Lawn Inks - Jet Black
Lawn Fawn Starry Stamp Shammy Case
Nuvo Crystal Drops - Morning Dew
Tim Holtz Distress Ink Pad - Vintage Photo
Tim Holtz Distress OXIDE Ink Pad - Blueprint Sketch
Tim Holtz Distress OXIDE Ink Pad - Tumbled Glass
Tim Holtz Distress OXIDE Ink Pad - Salty Ocean
Tim Holtz Distress OXIDE Ink Pad - Broken China
Art Glitter Designer Adhesive - Dries Clear 2 oz.
Scrapbook Adhesives 3D Permanent Foam Squares - White 1/4" x 1/4", 308 pk
Scrapbook Adhesives Crafty Foam Tape - White, 13 ft
Scotch Advanced Tape Glider (ATG) Refills - 1/4", 2 pk
Copic SKETCH Marker - Pale Aqua - BG000
Copic SKETCH Marker - Snow Green - BG0000
Copic SKETCH Marker - Neutral Gray No. 0 - N0
Copic SKETCH Marker - Neutral Gray No. 1 - N1
Copic SKETCH Marker - Neutral Gray No. 3 - N3
Copic SKETCH Marker - Yellow Green - YG03
Copic SKETCH Marker - Salad - YG05
Copic SKETCH Marker - Acid Green - YG07
Copic SKETCH Marker - Prawn - R24
Copic SKETCH Marker - Cadmium Red - R27
Copic SKETCH Marker - Carmine - R37
Copic SKETCH Marker - Blush - R20
Copic SKETCH Marker - New Blue - BG02
Copic SKETCH Marker - Holiday Blue - BG05
Copic SKETCH Marker - Lemon Yellow - Y13
Copic SKETCH Marker - Cadmium Yellow - Y15


