Instructions:
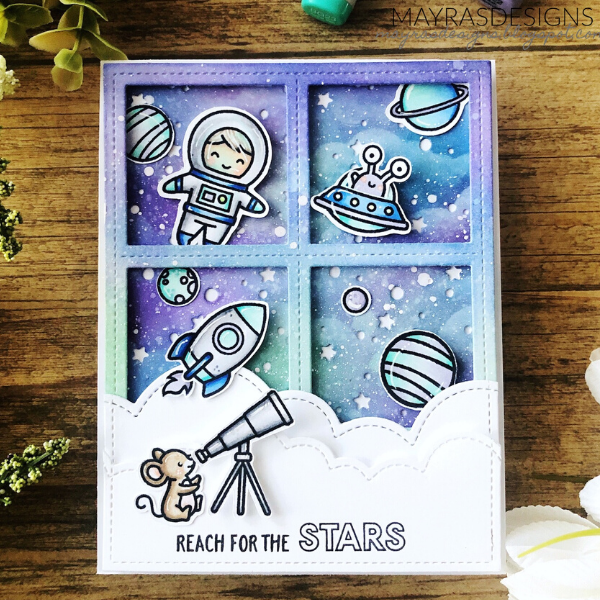
First, I used the Lawn Fawn Four Square Backdrop Portrait Die and the Snowy Backdrop Die to die-cut my card bases using Bristol Smooth Cardstock paper. I then die cut a regular white card base using Lawn Fawn Large Stitched Rectangle Dies, using the largest die in the set. From that same piece, I then die cut two cloud borders using the Lawn Fawn Puffy Cloud Borders Die Set.
Then I added Distress Oxide Inks to both of my die-cut bases to create the galaxy look in the same order to have a similar look on both. I began with Cracked Pistachio, then Picked Raspberry, then Wilted Violet, then Blueprint Sketch. I then spritzed a bit of water over both panels and dabbed them dry with a paper towel.
I then used the Lawn Fawn puffy cloud border stencil to add a cloud effect to the panels using Lawn Fawn Ink in the Yeti color. I began at the bottom of each panel and worked my way up.
Then I used acrylic paint in white mixed with a bit of water with a paintbrush to add white splatters to both panels.
Next, I colored the images I would be using for my card. I used Copic markers. I began with the little mouse and telescope images from the Super Star stamp set. For the mouse, I used E41, E55, E31, and a bit of R11. For the telescope and for the spacesuit for the adorable astronaut and space ship from the Lawn Fawn Out Of This World stamp set I used C1, then C0 and a bit of C5. For the planets and the alien from the Lawn Fawn Beam Me Up stamp set, and areas that are purple, I used V25, V22, and V20. For all of the darker blue areas, I used B28, B24, and B21. For the soft blue, I used BG23, BG11, and BG10. To finish with each of the images I added white accents using a Signo Uni-Ball gel pen in white.
Then I began to assemble my card. I glued the snowy backdrop base to a plain white layer of the same size. Next, I added foam tape to the Four Square die-cut panel and glued it to the base layer. Then I glued all of the images inside the openings. I then stamped the sentiment onto one of the puffy cloud borders that had been die cut earlier using Lawn Fawn Jet Black Ink. The "Reach For The" is from the Upon A Star stamp set and the "Stars" is from the Super Star stamp set. Then I glued the cloud borders to the base of the Lawn Fawn Four Square panel. Lastly, I added the mouse and telescope images to the front of the card. Glued my finished card panel to the card base and the card is now finished.
Instagram: @mayrasdesigns
Products Used:
Lawn Fawn Super Star stamp set: SKU: LF2241
Lawn Fawn Upon A Star stamp set: SKU: LF1407
Lawn Fawn Out Of This World stamp set: SKU: LF1330
Lawn Fawn Beam Me Up stamp set: SKU: LF1597
Lawn Fawn Jet Black Ink: SKU: LF1302
Lawn Fawn Yeti Pigment Ink: SKU: LF1003
Lawn Fawn Cloudy Stencil: SKU: LF2250
Lawn Fawn Glue Tube: SKU: LF1664
Lawn Fawn Large Stitched Rectangle Dies: SKU: LF767
Lawn Fawn Four Square Backdrop Portrait: SKU: LF2065
Lawn Fawn Snowy Backdrop Die: SKU: LF996
Lawn Fawn Puffy Cloud Borders: SKU: LF915
Copic Markers Used:
Copic Sketch Marker V25: SKU: V25-s
Copic Sketch Marker V22: SKU: V22-s
Copic Sketch Marker V20: SKU: V20-s
Copic Sketch Marker BG23: SKU: BG23-s
Copic Sketch Marker BG11: SKU: BG11-s
Copic Sketch Marker BG10: SKU: BG10-s
Copic Sketch Marker B28: SKU: B28-s
Copic Sketch Marker B24: SKU: B24-s
Copic Sketch Marker B21: SKU: B21-s
Copic Sketch Marker E21: SKU: E21-s
Copic Sketch Marker E50: SKU: E50-s
Copic Sketch Marker E51: SKU: E51-s
Copic Sketch Marker E13: SKU: E13-s
Copic Sketch Marker E41: SKU: E41-s
Copic Sketch Marker E55: SKU: E55-s
Copic Sketch Marker E31: SKU: E31-s
Copic Sketch Marker C5: SKU: C5-s
Copic Sketch Marker C1: SKU: C1-s
Copic Sketch Marker C0: SKU: C0-s
Copic Sketch Marker R11: SKU: R11-s
Distress Oxide Inks:
Picked Raspberry: SKU: TDO-56126
Blueprint Sketch: SKU: TDO-55822
Cracked Pistachio: SKU: TDO-55891
White Gel Pen


