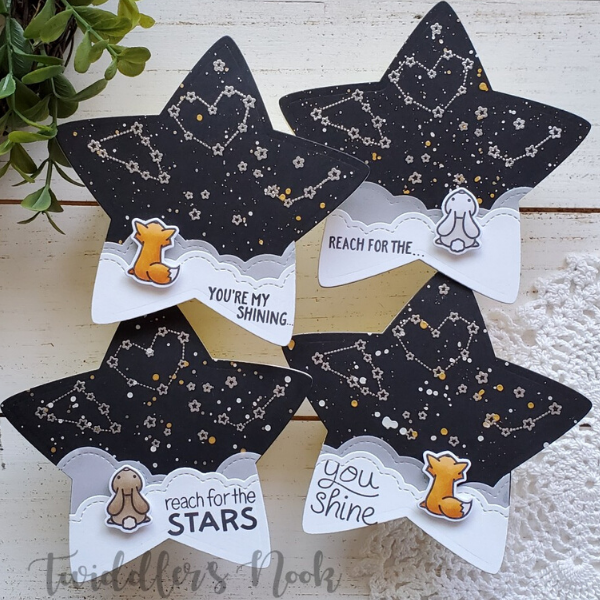
To make these cards I started with a ton of die cutting. Here's a list to get you going:
- From the largest of the puffy stars
- 4 black stars
- 2 white stars
- 2 iridescent vellum stars
- 4 white stars folded in half for the card base - crease line about 3/4 inch below the cut line
- Take your white and vellum stars and use the puffy cloud borders to cut your clouds. You can get 2 from each star.
From here I actually adhered everything together then took the stars from Upon a Star and heat embossed them in the sky with silver embossing powder. This looked a little plain so I created a cloud mask and splattered the sky with gold and pearl watercolors. I love this now!!!
I stamped, colored and die cut the small fox and bunny from Upon a Star and popped them up with foam tape on the cloudy ground. Last, I pulled out my Lucky Stars sentiments and stamped them on two cards. Then for the other two I split the sentiments from Upon a Star part on the front and the large word inside the cards.
These cards fit in a standard A2 size envelope and mail with a regular stamp. But how much fun would it be to received these fun shaped cards! Such a small change makes a huge impact on your card.
Instagram: @twiddlersnook
Products Used:
Lawn Fawn Upon a Star stamps LF1407
Lawn Fawn Upon a Star dies LF1408
Lawn Fawn Puffy Star Stackables LF521
Lawn Fawn Puffy Cloud Borders LF915
Lawn Fawn Lucky Stars stamps LF514
Lawn Fawn Jet Black ink LF1302
Lawn Fawn Silver Embossing Powder LF1538
Lawn Fawn Iridescent Vellum
Copics - YR21, YR24, YR27, E41, E43, E44, R11, W00, W1, W3, E000


