
Heya crafters,
I’m honored to have been asked by Scrapbookpal.com to share details about my card! My mom is a huge Beatles fan, so I grew up with their music. With COVID-19 and social distancing going on, many might feel like they are cooped up living in their own little yellow submarine right now. Hopefully, this is a fun read to help pass the time… and I won’t tell anybody if you don’t even feel like putting on pants today this week. Oh yeah, my Instagram is @CoolPaperArt, so you should virtually pop by, it would mean a lot! :D
THANKS!!
OK, let’s get down to business!
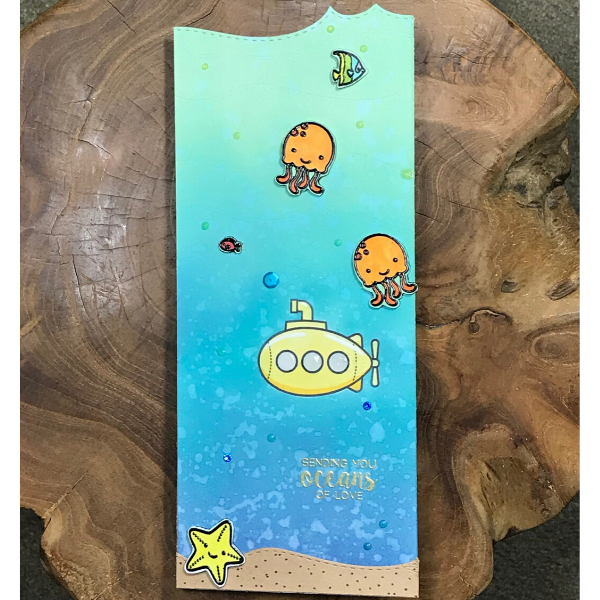
First, I stamped the submarine in the middle of the 8.5 x 3.5 paper with amalgam ink and colored it with Copics. Then, I made a mask out of a post-it note and stuck it over the submarine to protect it from the upcoming blending. (side note: the post-its that have full stickiness coverage on the back are great for masks). This will be a fairly simple card with a limited color scheme since I really want the sub to stand out.
Next, I ink blended the blue distress inks on the 8.5 in. x 3.5 in. sheet of 80# paper- I’m a sucker for all things ombre. Do your best and don’t worry if it isn’t perfect. Keep the mask on the submarine for now.
I then washed my hands (for 20 seconds!) and shook the water off on the background. Lay a paper towel on top, pull it off, and presto- all your blending imperfections are camouflaged. You can repeat this step too if you like. Now, you can peel off the mask. Isn’t that a satisfying feeling?
Then, I used a wave border die to cut a tiny bit off the top. I also used the silicone impressions pad and die cutting machine to lightly impress some other waves into the blue background. Now, your ocean is really looking like an ocean.
I then scored the 8.5 in. x 7 in. 110# paper in half at the 3.5 in. mark. I also cut the 8.5 in. side down to about 8 in. (this doesn’t need to be exact, you just don’t want the card-base to peek out from the waves you just cut). I personally wait to glue it together until the very end, but now we at least know what we are working with!
I stamped the fish, starfish, and jellyfish in amalgam ink and colored them in with copic markers. I kept the stamps in my MISTI. After the coloring, I stamped them again with Versamark ink and used black embossing powder. Heat set. Fussycut. You’re on a roll.
There was a bit too much white border around my cut out images, so I used a very light Copic marker to cover up the white. This was especially impactful in-between the jellyfishes’ tentacles. I also recommend having a few of the light copic colors in your stash (00, 000, or 0000 series) since they can be quite useful. I actually forgot to do the starfish but shhhh don’t tell.
I used the stitched hill die on some brown scrap paper and then added a few dots of brown marker on it- bam, it’s sand. Glue to bottom of your ocean and cut off any excess.
Then, I used some foam tape and/or glue to adhere the fish, jellyfish and starfish- the foam tape adds dimension.
Heat emboss the sentiment with gold embossing powder.
Finishing touches time! Any imperfections? Stick a sequin on it and don’t tell a soul about it. I also added a bunch of Nuvo drops (ombre style of course). The 2 swarovski crystals look either pink/red or dark blue depending on the angle you look at them, so that’s why I colored one of the fish pink.
More finishing touches time: I added white gel pen to the submarine for highlights and then used glossy accents on the 3 windows. Don’t touch that puppy for like 2 hours- I have accidently stuck my grubby paws in glossy accents 20+ times before, ha!
Then, after everything was dry, I glued the card front to the card base.
Pop that sucker in the mail!
Thanks again for coming by, hopefully you like some of my other Instagram cards too.
-John
Instagram: @coolpaperart
Products Used:
Submarine- Lawn Fawn: You are Sublime Stamps + Die
Fish and Sentiment- The Greeting Farm: Little Mermaids set (ALTERNATIVE)
Ocean Waves stitched border die set - Mama Elephant (ALTERNATIVE)
Stitched Hillside Borders die set - Lawn Fawn
Sizzix Big Shot and Silicone Impressions Pad for embossing
Starfish and Jellyfish- Lawn Fawn: So Jelly Stamps + Die
Distress Ink and Blending Tools - from bottom to top: Chipped Sapphire, Mermaid Lagoon, Salty Ocean, Cracked Pistachio
Sequins and 2 blue/red Swarovski crystals
Nuvo Drops- translucent series: Aqua Plains, Sea Breeze, Key Lime
Black Embossing Powder
One 8.5 in. x 3.5 in. Neenah white cardstock 80# (front of card)
One 8.5 in. x 7 in. Neenah white cardstock 110# folded in half at the 3.5 in. mark (sturdy card-base)
White pen for highlights
Post it note
Foam tape


Comments
Love this card!
It’s really neat I have looked at your card many times since I have a lot of ocean dies Good Job!
Lovely!!! Never Used Copic yet
Love the card!
Wow what a great card and superb tutorial. Thank you so much for doing it this way. It’s appreciated. X X
Great colors and card! #scrapbookpalgiveaway