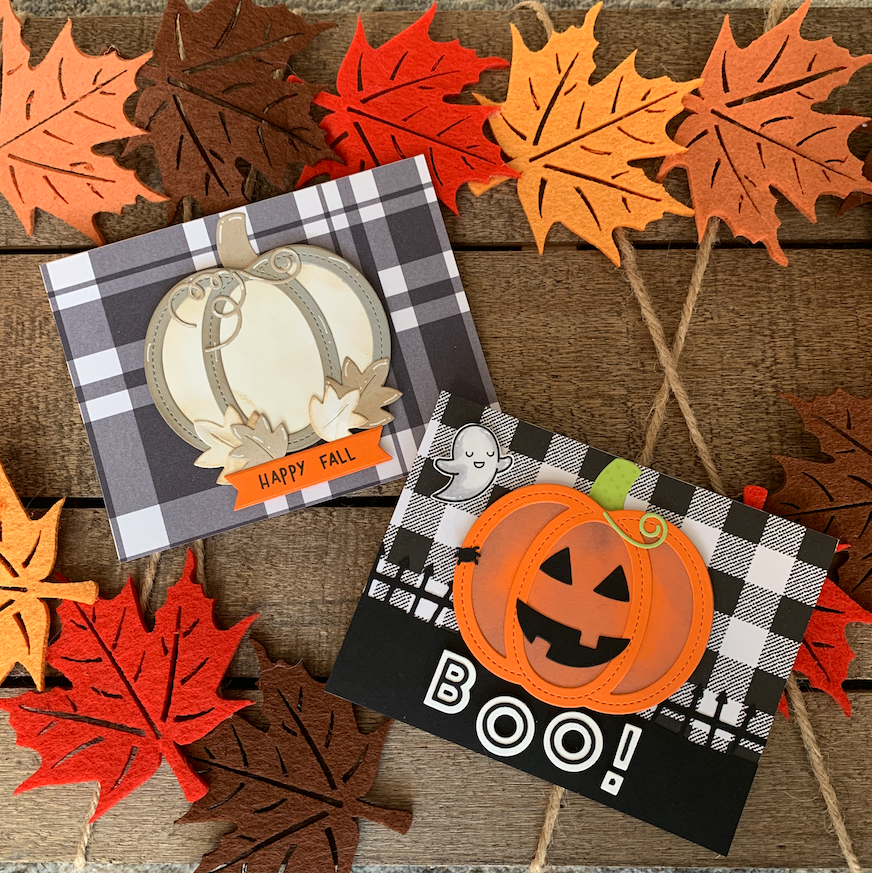
The stitched pumpkin dies from Lawn Fawn were some of my favorite this year and I knew right away I wanted to start my fall crafting off with some adorable pumpkins.
I started first by making the white pumpkin card. Earlier in the week I seen a bunch of different colored pumpkins at the store and loved the idea of doing a card with more of a “non-traditional” pumpkin.
Steps for White Pumpkin Card
- Cut card base out of black cardstock – 5.5” by 11” and scored at the 4.25” mark.
- Cut background plaid paper – I actually found this at the target dollar spot! Paper was cut to match the card base at 4.25” x 5.5” and glued to card base using matte adhesive
- Next I cut the white pumpkin out using the Lawn Fawn Outside in Stitched Pumpkin die. I used Neenah solar white 110 lb cardstock. I also cut a few of the leaves out using this same paper
- Using the other accent pieces from the die set, I cut some coordinating leaves and vines out of Neenah Desert Storm card stock
- I then die cut the pumpkin framing using the Lawn Fawn Stitched Pumpkin Frames. For this die cut I selected a medium tone gray, to better accent the white pumpkin feel
- Next I took each die cut piece and blended on a bit of Tim Holtz Distress Oxide ink in Gathered Twigs to give the pieces a bit of a weathered look
- For the sentiment, I stamped a sentiment from the Lawn Fawn set – Thanks A Latte - onto some orange card stock and cut out using the Lawn Fawn Banners lawn cuts
- Finally I assembled all pieces by gluing with a matte adhesive – popping up both the pumpkin body and the sentiment with 3m ½” foam tape (alternative: Tombow Double-Sided 3D Foam Tape)
Steps for Jack O’ Lantern
- Cut card base out of black cardstock – 5.5” x 11” and scored at the 4/25” mark.
- Cut background plaid paper – Same paper pack from the target dollar spot! Paper was cut to match the card base at 4.25” x 5.5” and glued to card base using matte adhesive
- Next I cut both the base pumpkin and pumpkin framing out of Orange cardstock using the Lawn Fawn Outside in Stitched Pumpkin die and coordinating Stitched Pumpkin Frames die
- To give the pumpkin more depth, I took just the base pumpkin cutout and blended on some Tim Holtz Distress Oxide ink in Hickory Smoke
- I then cut the accent stem and vines out of Lawn Fawn patterned paper (I’m not sure which one! It was a scrap.)
- Next I pulled out some of my other Halloween themed Lawn Fawn die sets to cut some fun accents. First cutting the darling spider from the Build-a-House Halloween Add-on and then the Lawn Fawn Spooky Border Fence to sit along the bottom background. Both were cut from black card stock.
- Using the same black cardstock, I cut out the cheerful jack o’ lantern face using the die accents from the Lawn Fawn Outside in Stitched Pumpkin die set.
- Next I cut out the sentiment using the Simon Says Stamp BOO! Wafer dies.
- To finish off the card, I decided to stamp just one little ghost friend from the Lawn Fawn Spooktacular stamp set. I colored him using Copic markers in N0 and N2
- Once I had all of my pieces, I assembled everything by gluing with a matte adhesive and popping up both the pumpkin and “BOO!” sentiment with 3M ½” Foam Adhesive (Alternative: Tombow Double-Sided 3D Foam Tape).
Products Used:
- Lawn Fawn Outside in Stitched Pumpkins – SKU:LF2057
- Lawn Fawn Stitched Pumpkins Frames - SKU:LF2058
- Lawn Fawn Spooktacular Stamp Set - SKU:LF698
- Lawn Fawn Build-A-House Halloween Add-on - SKU:LF2047
- Lawn Fawn Spooky Border Fence - SKU:LF1786
- Lawn Fawn Thanks a’ Latte Stamp Set- SKU:LF1761
- Tim Holtz Distress Oxide - Gathered Twigs - SKU: TDO-56003
- Tim Holtz Distress Oxide - Hickory Smoke - SKU: TDO-56027
- Lawn Fawn Lawn Cuts - Extra Sentiment Banners - SKU: LF1140
- Copic Sketch - N00, N2
- Card stock – various colors
- 3M ½” Foam Adhesive (Alternative: Tombow Double-Sided 3D Foam Tape)
- Simon Says Stamp BOO! Wafer Dies
Blog: www.creativityinreach.com
Instagram: https://www.instagram.com/creativityinreach/


