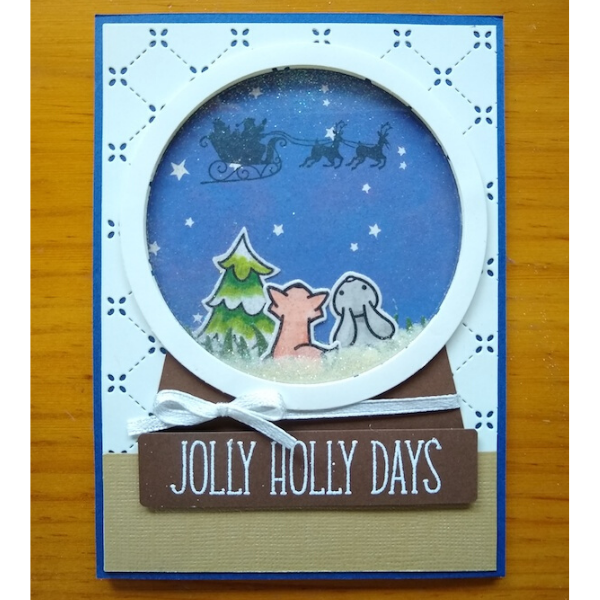
Snowglobe Shaker Card
1. Use the circle dies to create the globe part of the snowglobe, then cut down a rectangle shape to build the base of the snowglobe. Put together the snowglobe on a background cardstock. For my background I used the Quilted Backdrop die. Just to add some sentiments, I white-embossed the "jolly holly days" phrase onto the snowglobe base.
2. Make a snowy night scene and the critters by using the Starry Scene and Upon a Star stamp sets. I already have a Santa silhouette stamp I got from years ago, but Lawn Fawn also has a super cute Santa silhouette stamp along with some other really cute critters in the Winter Skies stamp set that could be used for similar scene as well.
3. Have the base panel (snowy scene) and the top panel (snowglobe) ready. Put some sequins or white embossing powder on top of the snowy scene panel. On the back of the snowglobe panel, first tape down a piece of acetate sheet over the circle/globe, then on top of the acetate sheet further tape down foam tapes. Then tape the snowglobe panel down onto the snowy scene panel, then the Shaker card is done!!
4. Enjoy the Shaker card!
Products Used:
Spellbinders Nestabilities Dies - Standard Circles, Small (SKU: S4-116)
Avery Elle Clear Stamps - Starry Scene (SKU: ST-18-36)
Lawn Fawn Clear Stamps - Upon a Star (SKU: LF1407)
Lawn Fawn Lawn Cuts - Upon a Star (SKU: LF1408)
Lawn Fawn Lawn Cuts - Quilted Backdrop (SKU: LF1625)
Lawn Fawn Lawn Cuts - Grassy Border (SKU: LF613)
Lawn Fawn Clear Stamps - Deck the Halls (SKU: LF721)
Stampabilities Santa Sleigh Silhouette (alternative: could use Lawn Fawn Clear Stamps - Winter Skies, SKU LF1763)


