
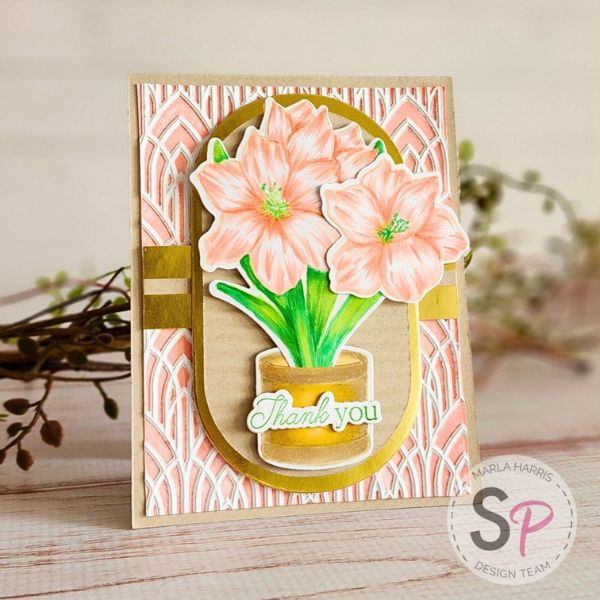

Hello, friends, Marla with MAD About Cards and Crafts here today. Who doesn't love seeing amaryllis flowers in the winter? Their delightful pop of color brings a soft touch of beauty to the winter season. Today, I am sharing a card I created featuring a new stamp and die set that was illustrated by Kelly Taylor for Honey Bee Stamps called Holiday Blooms. The sentiments included in this set allowed me the option to create an after Christmas Thank you card, stretching it's use beyond the Christmas season.

One of my favorite ways to find inspiration is to simply Google images of the flowers I am working with. I found this lovely variety of amaryllis flowers that was swoon worthy and perfect for my card. After stamping the images with Antique Linen Distress ink, I set out to no line color my flowers to mimic the peachy pinks. I used my R20, 21 and 22 Copic markers, which were a perfect match. For the greens I selected G05, 07, YG06 and 23. I colored my pot a rich gold with Y26 and 28.

After using the coordinating dies to cut out my images, I worked on selecting a focal point mat that would complement the flowers. I settled on Spellbinders Stylish Ovals. I used my crimping tool on the smaller oval, which I cut from kraft cardstock. Next, I cut a second, larger oval from gold foil cardstock. I adhered the two together adding foam tape to the back of the gold oval for dimension. Next, I used the gold foiled cardstock and my paper trimmer, to cut another rectangle to 1" x 4" and cut a kraft strip to about a 1/4" x 4" and adhered them together.

I selected the Sizzix Arched 3D Embossing Folder and Saltwater Taffy Distress Oxide ink for the background. I inked the embossing folder on the front side, spritzed my white cardstock with water and used the appropriate sandwich to emboss my panel, using my die cutting machine. Then, I cut it down to a bit smaller than 4" x 5.25". I adhered the panel to an A2 kraft card base and began building the rest of my card.

After adhering the two strips of kraft and gold cardstock together I added it horizontally to the center of my embossed panel. Once I adhered the ovals to my panel, I added more foam tape to my floral cluster. To create the cluster, I chose one of the larger flowers with leaves to add to the gold pot. To fill out the focal point, I added one of the single flowers with foam tape doubled to the right edge of my image for stability.

Using Catherine Pooler's Grass Skirt ink, I stamped the sentiment and again, used the Holiday Wishes coordinating dies to cut the sentiment out. I cut it three times and adhered all the pieces together for more dimension. Finally, I adhered it to the center of the pot to complete the card.

Thank you so much for stopping by. Until next time...... Marla
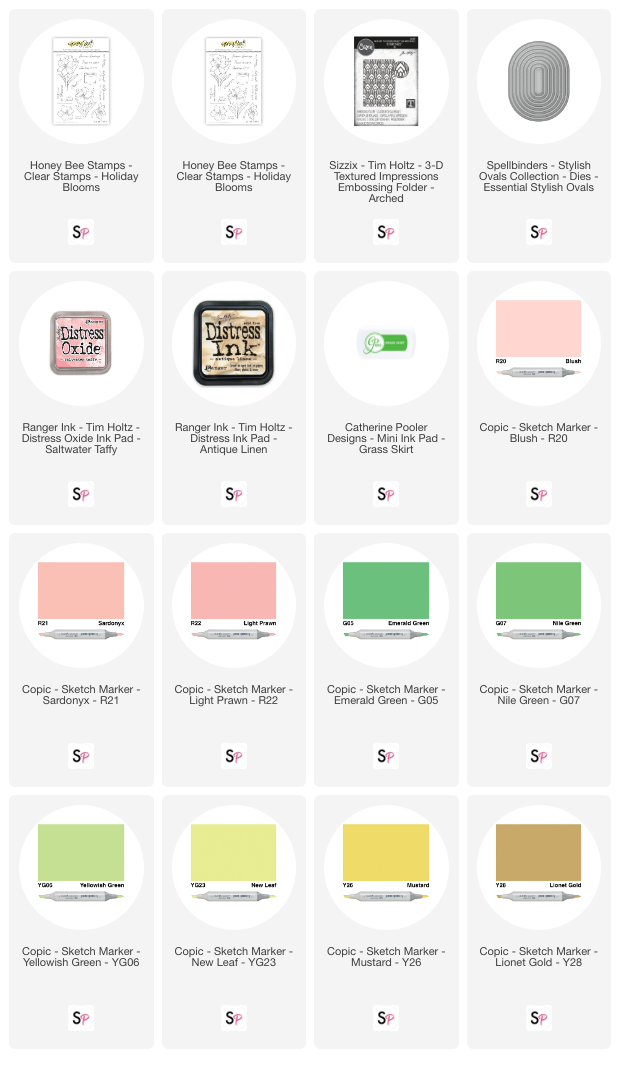
Supplies Used:


Comment
Beautiful and love the example flower colours you used for your own design, just stunning and love the way you presented your card xx