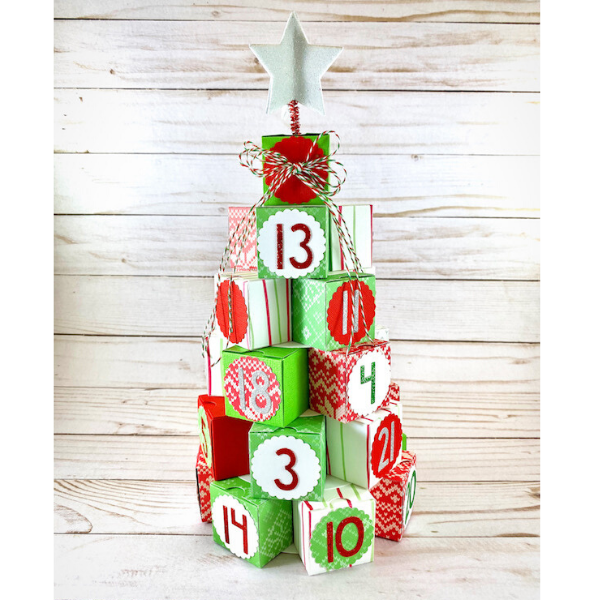
Hi creative friends its SweetD here from SweetDcreations11 and I’m back to share with you a project I absolutely LOVE making for the holidays. It’s Christmas Advent Calendar time!! Woooo hoooo!! This super cute reusable advent calendar is so fun to assemble & decorate but even more fun to fill with goodies & surprises for each day. Hope you enjoy, and are inspired to create your own!! Let’s get started.
Step 1: I used Lawn Fawn’s Tiny Gift box die to die cut 26 boxes from Lawn Fawn Knit Picky 12x12 Card stock as well as my own handmade pattern paper, green & red textured card stock.
Step 2: I used Lawn Fawn’s Scalloped Circle Stackables die set to cut 26 circles for the fronts of each tiny gift box from the same Knit Picky paper, plain white card stock and also red textured card stock to give some variation.
Step 3: Using green, silver and red sparkle card stock I cut numbers 1-25 with Lawn Fawns Finley’s 123’s die set. And adhered them to each circle with Tombow Mono Multi Liquid Glue.
Step 4: I prefer to have my boxes open down like a mail box so I always adhere the circles to the boxes while they are still flat. I added finished numbered circles with my Xyron mega tape runner, before building each box. One box will only have a circle and no numbers this will be the tree topper.
Step 4.5 THE BONUS BOX:
So since I LOVE having a box for Christmas Day I decided it would be so fun to hide a tiny stamped image inside instead of a treat or gift. I chose an adorable Santa image and present stack from Mama Elephant Little Agenda Trains stamp set, and colored them with colored pencils, and embellished with wink of Stella shimmer pen. This is such a fun unexpected surprise being that most advents go only until Christmas Eve!!
Step 5: Once all score lines had been creased I assemble each box using my Xyron Mega tape runner.
Step 6: To build each layer of the tree I first mapped out which boxes I wanted for each one of the layers.
Map:
Bottom 7 boxes
Next 6 boxes
Next 5 boxes
Next 4 boxes
Next 3 boxes
Tree Topper 1 box
Step 7: I used the Lawn Fawn Circle Stackables to die cut a base for each layer/ ring of the tree out of white card stock. Starting with the biggest circle which I cut twice for the bottom 2 layers, and then moved one size down for each layer after that.
Step 8: Out of coordinating colored card stock I cut 27, 1 inch by 2 inch strips of paper that I score at the 1 inch, and fold to make a connector piece for my boxes to form a ring. Using my Xyron mega runner I connect each box until I have one complete circle for each layer. Ending with the blank box for my stand alone star topper.
Step 9: With my Tombow glue I adhere each completed ring to its coordinating circle die cut and then glue them together in stacked order from biggest to smallest forming a tree shape. With the smallest circle on top with the one blank circle box.
Step 10: I took the 26th box the (one with no numbers) and I hole punch a tiny hole in the top. I used a star nesting die set to cut out 3 stars from glitter fun foam. And added a piece of sparkle pipe cleaner to make it stand up, and adhered them together using the Xyron tape runner. Then I stuck the finished star topper into the hole I made at the top of my last box and bent it sideways so it wouldn’t fall over. To make sure it wouldn’t move around at all I taped it down after bending it and then glued the box shut. For a finishing touch I tied 4 pieces of Lawn Fawn hemp together to make a sweet little bow.
THATS IT!! I seriously LOVE making these, they are so fun to display when finished and so enjoyable for the recipient to open daily. They are the perfect size to easily mail to a special friend or loved one and can be used over and over again. I hope you’ve enjoyed learning how I created this sweet little advent calendar. And encourage you to give it a try!!
Instagram: @SweetDcreations11
Products used:
Tombow Mono Multi Liquid Glue - SKU: 52190
Copic Sketch- Mistletoe G46 - SKU: G46-s
Copic Sketch- Strong Red R46 - SKU: R46-s
Xyron Mega Tape Runner - SKU: 0701-05-00
Lawn Fawn Lawn Cuts - Circle Stackables - SKU: LF522
Lawn Trimmings Hemp Cord- Mistletoe - SKU: LF527
Lawn Fawn Petite Paper Pack- Knit Picky - SKU: LF1529
Lawn Fawn Lawn Cuts - Finley’s 123’s - SKU: LF770
Lawn Fawn Lawn Cuts - Tiny Gift Box - SKU: LF1485
Lawn Fawn Lawn Cuts - Scalloped Circle Stackables - SKU: LF523
Mama Elephant:
Little Agenda Trains stamp set
Honey Bee Stamps:
Star nesting die set
12x12 white card stock with home made pattern red/green stripes
12x12 green and red textured card stock
Sparkle card stock colors, red, green, silver
8.5 x 11 110lbs white card stock
White sparkle fun foam
Red sparkle pipe cleaner


