
Hey friends! This is Nancy from Rowhouse Greetings and I’m back today with a project featuring the Ornaments stamp set, layering stencils, and coordinating dies from Pinkfresh Studio. I love the designs from Pinkfresh Studio and have many stamp sets and layering stencils in my personal stash. So I was excited to get to work on today’s project!

Featured Products
- Ornament Stamp Set - Pinkfresh Studio
- Ornament Stencils - Pinkfresh Studio
- Ornaments Die - Pinkfresh Studio
To start, I cut a piece of heavy weight cardstock to 4.25 x 11 inches, scored at 5.5 inches to create a cardbase. Next, I cut a piece of design paper to 4.25 x 5.5 inches and a piece of white cardstock to 4 x 5.25 inches. I set it all aside until it was time to assemble the layers.
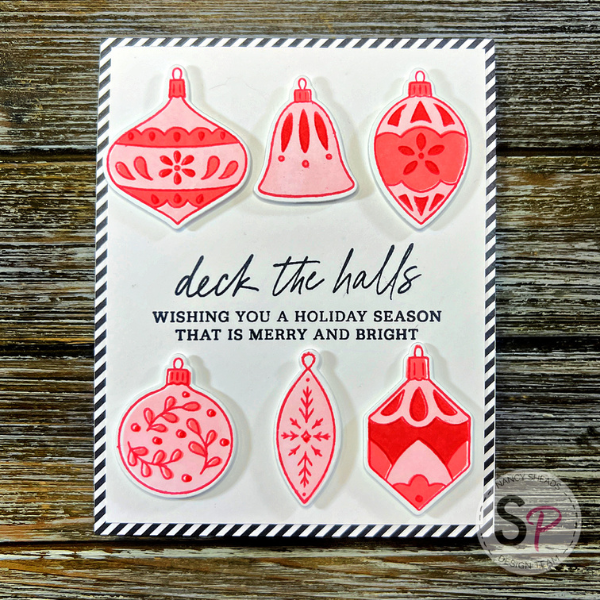
To stencil the ornaments, I cut a piece of white cardstock 4.25 x roughly 6 inches. I prefer to use my MISTI Stamping Tool for stenciling so that I can keep all of the layers lined up. So I placed the cardstock and the first layer in the MISTI (I prefer placement in the lower left corner) and used the magnets to hold both in place. Then I used Mini Ink Blending Tools with Domed Replacement Foams to apply ink for each layering stencil as follows:
Stencil 1: Spun Sugar
Stencil 2: Worn Lipstick
Stencil 3: Festive Berries

Next I lined up the Ornament Stamp Set with the stencil images in my MISTI. I used Versafine Clair in Glamourous to stamp the outlines and the details for the ornaments.

Next, I used the coordinating die to cut out the ornaments and applied 3D Foam Small Squares to the back of each.

On the 4 x 5.25 white panel, I stamped the sentiments roughly in the center using Versafine Clair in Nocturne. I lined up the ornaments, removed the release paper from the back and adhered them to the panel. To complete the card, I assembled the layers as shown.

Let’s take one more look at the completed card.

Hope you enjoyed today’s project! See you again soon!
Nancy
Supplies
- Ornament Stamp Set - Pinkfresh Studio
- Ornament Stencils - Pinkfresh Studio
- Ornaments Die - Pinkfresh Studio
- Distress Inks in Spun Sugar, Worn Lipstick, and Festive Berries
- Versafine Clair in Glamourous and Nocturne
- MISTI Stamping Tool (original) - My Sweet Petunia
- Mini Ink Blending Tool - Ranger
- Domed Replacement Foams - Ranger
- 3D Foam Small Squares - Scrapbook Adhesives

