
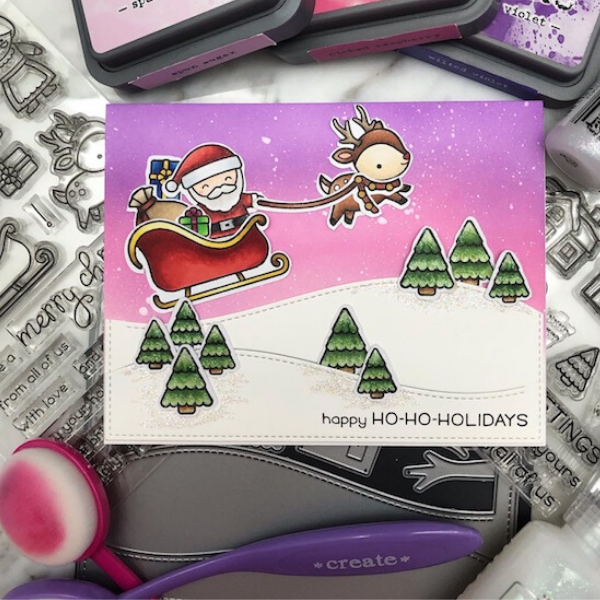
Step 1: Color and cut out stamped images.
Step 2: Die cut Backdrop die, trim away upper frame area.
Step 3: Blend background, starting with lightest color and working upward. Splatter background with diluted white acrylic paint and allow to dry.
Step 4: Attach snow drift pieces to background with doubled sided adhesive, leaving top edges free.
Step 5: Attach images to card with double sided adhesive, tucking a few trees into free edges of snow drifts.
Step 6: Stamp sentiment.
Step 7: Apply Nuvo glitter drops to trees, and apply Stickles around bases of trees.
Instagram: kaydemonbren8
Products Used:
Lawn Fawn Clear Stamps - Ho Ho Holidays - SKU: LF2029
Lawn Fawn Clear Stamps - Winter Village - SKU: LF1472
Lawn Fawn Lawn Cuts - Stitched Hillside Backdrop: Landscape - SKU: LF1502
Neenah Classic Crest Solar White (card base and snow drifts)
Strathmore Bristol Smooth (ink blended background)
X-Press It Blending Card (colored images)
Gina K. Designs Amalgam Ink Pad - Jet Black (stamped images) - SKU: GK1006
Versafine - Onyx Black (sentiment)
Tim Holtz Distress Oxide Ink Pad - Spun Sugar - SKU: TDO-56232
Tim Holtz Distress Oxide Ink Pad - Picked Raspberry - SKU: TDO-56126
Tim Holtz Distress Oxide Ink Pad - Wilted Violet - SKU: TDO-56355
Copic Markers
Ranger Stickles Glitter Glue - Star Dust - SKU: SGG20622

