
Hey crafty friends! Tiffany here with some holiday inspiration using the new Honey Bee Stamps Good Tidings stamp, stencil, and die set. I am in full-on Christmas mode as I need several cards to send out to friends and family. I get stressed out if I wait until the last minute so I like to start as early as the summer. I love how easy it was to create a beautiful card with a few supplies from Honey Bee. I hope you're inspired to try something similar!

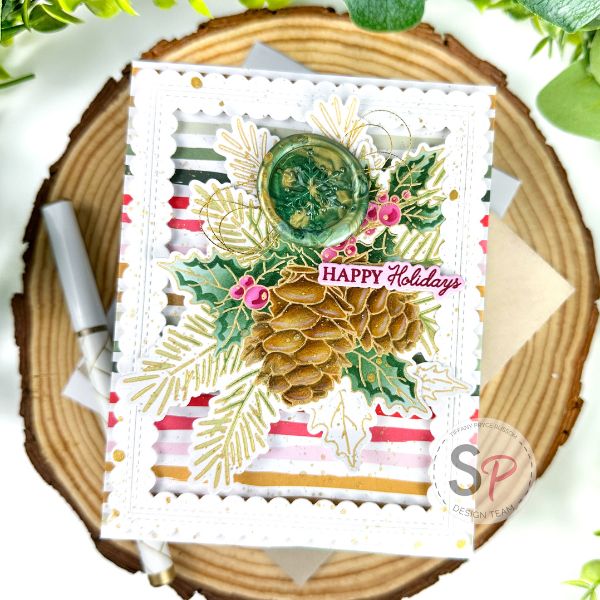
I started by stamping Good Tidings in clear, embossing ink and heat embossing with gold embossing powder. I heat embossed two images. After heat embossing, I used the Good Tidings stencils to color in one image. There are six stencils, and they are very easy to align. I used Catherine Pooler Spruce and Matcha dye inks for the leaves. The Pinkfresh Studio Green Gables inks are very similar. To give the leaves additional dimension, deepen the ink blending at the base of the leaves. It is subtle, but adds a little life to the image. Because the images are pretty small, I recommend smaller ink brushes like the Altenew Detailed Blending Brushes. The angled brushes help add color more precisely. For the pinecones, I ink blended a base of Buttercream and then a light brown on top. For the berries, I used Catherine Pooler Pink Champagne and Peppermint Scrub. Pinkfresh Studio Rose Garden is a good alternative.


To add extra dimension to the pinecones, I added shading with a black and dark brown colored pencil. I added highlights with a white pencil. After ink blending, die cut the image using the Good Tidings Honey Cuts. Die cut a frame from white cardstock using the Pinkfresh Studio Stitched Scallop Rectangles.

Using the heat embossed, but uncolored image, I trimmed some extra leaves with scissors. I liked the addition of the plain gold leaves to fill out the focal image. I tucked these leaves in behind the main image and dry fit everything over patterned paper. Once I was sure I liked the layout, I popped up the frame and image with 3D foam strips and adhered in place. I splattered the panel with gold, metallic watercolor.

Next, I used the Holiday Wishes Wax Melts with the Snowflake Wax Stamper to add a wax seal to the card front. I used four wax melts in dark green, light green, and two in gold. I heated the Wax Melting Spoon with my embossing gun until fully melted, poured the mixture on my silicone mat, and stamped with the Snowflake Stamper until the wax was cool to the touch. This was my very first time using a wax seal, and it was very easy to do. Behind the wax seal, I added some thin, gold thread. Regular adhesive didn't adhere the seal to my card so I used Collage Matte Medium.

Finally, I stamped a sentiment from Good Tidings in Peppermint Scrub and die cut with the coordinating die. I ink blended the sentiment background with a light hand for a light pink color. I also die cut three more layers behind the sentiment for added dimension.

Thanks so much for visiting the blog. If you're inspired to do something similar, please tag ScrapbookPal and me on Instagram. We love to see what you create. Until next time, happy crafting!
Supplies:


Comment
Beautiful design! I love this lovely ink blended main image and how you added extra foliage to complete the design!