1. Using the largest Stitched Rectangle Frame, cut two pieces of green cardstock. Using my Picket Fence Studios Blender Brushes, I inked the edges of one panel with Distress Oxide Inks in the colors Mowed Lawn and Lucky Clover. Stamping some ink on my work surface, I dipped a watery paint brush to splatter some green drops onto the panel.
2. Using the Lawn Fawn Cattails Border cut the second panel about 1/4 inch from the stitched detail. Turn 180 degrees, and cut a second from the other side. Gently ink both borders with the same technique as step one. Cut the cattail “flower heads” using the included die, from scrap paper inked with Brushed Corduroy Distress Oxide Ink.
3. Take your second cattail border and trim the main clusters from the border, creating two separate bushes. Carefully glue all of the brown flower heads onto the stems. Then layer the clusters behind the “intact border”, making sure to switch them, so each bush has 5 full cattails. Place it aside for later.
4. Now we will make the pond. I used both Lawn Fawn Stitched Pond dies, the Stitched Pond, and the Stitched Pond Frame. Cut the Stitched Pond from both light Aqua cardstock and clear acetate. Use the Stitched Pond frame and cut two pieces as well. One from green cardstock and one from adhesive fun foam craft sheets. I had black double thick foam sheets on hand, but you can cut it from regular foam and double it up.
5. Heavily ink the edges of the blue pond cardstock piece with Peacock Feathers Distress Oxide Ink, leaving a soft glow in the center. I splattered it with glittery Liquid Stardust. Then I decided to stamp the school of fish from Mermaid for You into the pond using Mermaid Lagoon Distress Oxide Ink.
6. Removing the release paper from the foam I adhered the foam onto the blue pond. I placed a generous amount of an aqua sequins mix into the pond, then attached the acetate with 1/8 inch Scor Tape. Finally I used liquid Lawn Fawn Glue Tube to attach the green pond frame onto the top. Once in place, I put it aside to dry with a large acrylic block on top so it would remain flat.
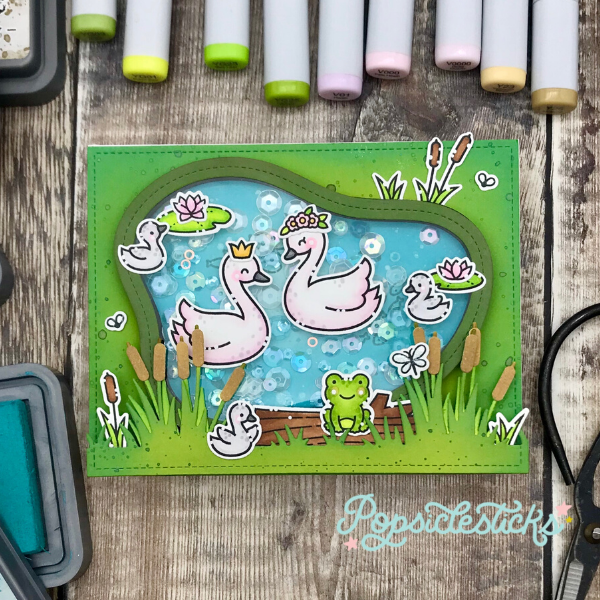
7. Now we get to the fun part. Stamp most of the images from Swan Soirée with Jet Black ink. I also used images from Toadally Awesome. I colored my images with a very limited color palette and Copic Markers. I used YG greens and some very light violets and Neutral Grays. After die cutting, I like to highlight my images with bright white dots.
8. Once the coloring is complete it’s time to assemble. Adhere the log behind the Cattail Border. I tucked a little frog behind the short grass but in front of the log. I also adhered a baby swan to the front. I tucked a tuft of grass and a single stamped cattail behind the border as well.
9. Using the same thickness of foam that we used for the shaker, apply a long Skinny strip to the very bottom of the inked green panel. Make sure it won’t be visible behind the Cattail Border. Before applying the cattails, glue the shaker pond onto panel, right above the foam strip. Now adhere the full and beautiful Cattail Border. Glue the little flies and grasses onto the panel. Carefully adhere the swans onto the pond making sure to tuck one behind the cattails, and to let the little babies and lily pads extend onto the pond frame. It’s important to place an acrylic block on top while the glue dries so the images don’t curl up from the acetate.
10. Once dry, I added some Wink of Stella to the wings and mounted The Whole thing onto my card base using Scor Tape. Please keep in mind that this thick card will not mail without extra postage. But it is so beautiful and definitely worth creating.
Thank you for following along, I hope you feel inspired to make your own pretty pond scene.
Davina Cantrell
Instagram: @popsiclesticks
Products Used:
LF Swan Soirée LF2219
LFLC Swan Soirée LF2220
LF Toadally Awesome LF 1581
LFLC Toadally Awesome LF 1582
LF Mermaid For You LF 1167
LFLC Large stitched rectangle frame LF 767
LFLC Cattails Border LF 2257
LFLC Stitched Pond LF 2067
LFLC Stitched Pond Frame LF 2068
Distress Oxide Mowed Lawn TDO 56072
Distress Oxide Lucky Clover TDO 56041
Distress Oxide Peacock Feathers TDO 56102
Distress Oxide Brushed Corduroy TDO 55839
Distress Oxide Ink Mermaid Lagoon TDO 56058
Liquid Stardust LF 2000
1/8 Scor Tape SP201
Glue Tube LF 1664
Jet Black Ink LF 1302


