

Hello ScrapbookPal friends! I'm back today with another project I made for the ScrapbookPal Design Team, using the brilliantly designed Pinkfresh Studios Indigo Roses clear stamp set with coordinating dies and stencils. This set comes with three sentiments. The one I chose first, "You make my heart bloom", comes with a coordinating die, but I didn't use it for this card. I went with a heart theme as Valentine's Day is coming up, but I think this makes a lovely friendship card as well.
I started by choosing my colors. I was thinking of a lighter orangey rose flower with some darker accents. I experimented with some color combinations with my Distress Ink swatches, and landed on Spiced Marmalade with Ripe Persimmon as the accent. I tried it with the stencil, and liked the results, so I decided to go ahead with it. For the greens, again I experimented with a couple different combinations and chose Crushed Olive with Forest Moss for the accent color. I thought these warmer greens went well with the orange flowers.
I stamped the set of flowers by placing the stamp upside down on my work surface, inking it with Versafine Onyx Black, and then placing my white cardstock on top of it. These stamps don't fit in my Misti, so this is how I am able to use them and stamp everything at one time. I just need to be careful so nothing shifts while I'm pressing down on the paper to pick up the ink from the stamp, or removing the paper from the stamp. I added Lawn Fawn Clear embossing powder to the stamped images, and heat set them. I didn't want the black to smear at all while I was ink blending my flowers and leaves.
I used low tack painter's tape to tape down my cardstock, and also to hold the stencils in place as I inked them up. The stencil cutouts are very small and intricate. It helps if you have some smaller blending brushes, like the Altenew Mini Blending Brushes, but you could try it with whatever brushes you have, or even with a foam applicator. Since I had the mini brushes, I blended a little heavier in the center of the flowers to get some nice shading. While I was blending the Spiced Marmalade onto the flowers, I noticed some small berries that I didn't see before. I wanted to make them a different color, so back to my ink swatches I went! The Uncharted Mariner jumped out at me, and I thought that went well with my color scheme. I blended the first flower layer, Stencil 1, with a lighter touch, and then blended the second flower layer, Stencil 3, with a little heavier ink application. This gave me some contract on the berries, using the same ink color.

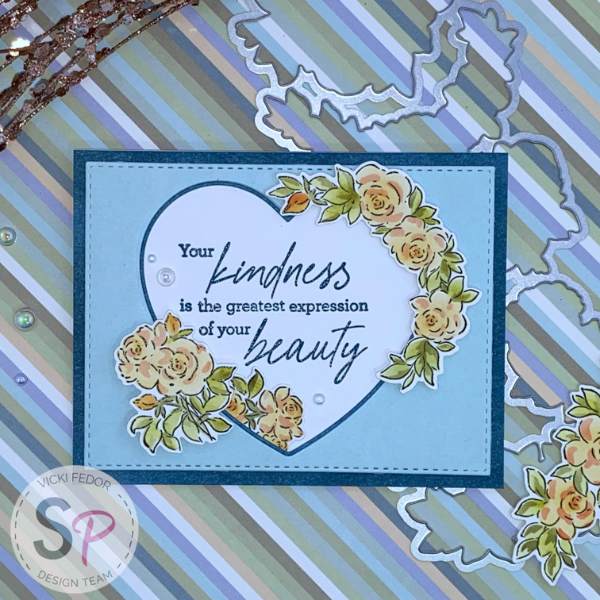
After I finished blending, I cut the images out with the coordinating die. I just love that everything cuts out in one pass! I went through my dies, looking for a heart shape to add my sentiment to the card. Luckily I had just used the new Tim Holtz Sizzix True Love Colorize Thinlits dies set on a different card, and knew there was a heart die that would create the perfect, delicate frame for my sentiment. I chose a piece of blue cardstock from my stash that would coordinate with the Uncharted Mariner. I cut the heart outline shape out of the blue cardstock in the center of the paper, and then cut it again out of a piece of white cardstock I had colored with the Uncharted Mariner. I stamped the "You make my heart bloom" sentiment on white cardstock with Uncharted Mariner Oxide Ink. I used my Misti Stamping Tool for this, as I like to stamp sentiments with my Misti to get a clean, crisp image. I usually stamp twice, and the Misti allows me to get it perfectly aligned. I used Oxide ink so that I could add some Lawn Fawn Clear embossing powder. After it was heat set, I layered the front of the card together, and added a background piece of white cardstock colored with the Uncharted Mariner.

After playing around with the placement of the flowers, I decided I wanted the heart to be offset from the center of the card so I could use the bigger floral cluster on this A2 sized card. I cut another piece of the light blue cardstock with the heart off center to the right, and attached the floral dies with Scrapbook Adhesives 3D Foam Squares White Variety Pack foam squares. I added some Pinkfresh Studios clear drops to accent the card.
While I had everything out, I decided to make another card with the leftover die cut flowers that I didn't use on the first card. This time I used a different sentiment, and layered one of the flower clusters inside of the heart at the bottom. I love how I can get multiple cards out of these sets. It only takes a few more minutes to create a second card with the same theme, using the leftover floral pieces. In the past I would have saved the extras for another day, but I found I ended up with lots of bits and pieces laying around that never got used. I just don't work like that. For me, I need to use things up while it's fresh in my mind. Find what works for you!

I hope you enjoyed this card, and are inspired to check out this gorgeous set from Pinkfresh Studios, available at ScrapbookPal.com!
Products used in this project, available at ScrapbookPal.com:
Pinkfresh Studios Indigo Roses clear stamp set
Pinkfresh Studios Indigo Roses coordinating cuts dies
Pinkfresh Studios Indigo Roses stencils
Tim Holtz Sizzix True Love Colorize Thinlits dies
Altenew Mini Blending Brushes
Bearly Art Precision Craft Glue - The Bundle (with precision tip)
Scrapbook Adhesives 3D Foam Squares White Variety Pack
Misti Stamping Tool - Original
VersaFine Archival Pigment Ink, Onyx Black
Distress Ink Pad - Spiced Marmalade, Ripe Persimmon, Crushed Olive, Forest Moss, Uncharted Mariner
Distress Oxide Ink Pad - Uncharted Mariner
Lawn Fawn Clear embossing powder
Pinkfresh Studios clear drops

