Step 1: Cut chipboard down to three pieces (2) at 5 3/4 x 4 1/2 (covers) and (1) 5 3/4 x 2 (spine).
Step 2: Connect (2) pieces of 8 1/2 x 11 plain card stock together using double sided tape to make one long piece.
Step 3: Add double sided tape to all chipboard pieces.
Step 4: Lay the chipboard spine piece in the center of the connected pieces of card stock you just made.
Step 5: Lay the last two pieces (covers) on either side of the spine piece leaving a small gap of about 1/8” in between.
Step 6: Use you bone folder to trace around the edge and fold over the card stock (towards chipboard).
Step 7: Cut off excess card stock leaving about 1” around the perimeter.
Step 8: Miter all four corners.
Step 9: Add adhesive around all exposed card stock.
Step 10: Fold over the card stock onto the chipboard and use your bone folder to secure.
Step 11: Gently guide your cover to close using your bone folder at the spine.
Step 12: Cut down pattern paper to 7 3/8 x 1 7/8 and wrap your spine starting on the unfinished inside top and ending on the unfinished inside bottom.
Step 13: Cut down a plain sheet of card stock to 5 3/4 x 11, add adhesive and secure to cover the inside of the album.
Step 14: Take your bone folder again and follow along the crease mark to help close your album covers.
Step 15: Cut down card stock for the envelopes. (2) 5 1/2 x 4 1/8 and (1) 6 1/2 x 5 3/4.
Step 16: Take (1) piece of the 5 1/2 x 4 1/8 and round one side (2 corners) *optional
Step 17: Take the larger piece (6 1/2 x 5 3/4) and score. Start on the 6 1/2 inch side and score at 1/2”, turn 90 degrees and score again at 1/2”, turn 90 degrees and score at 1/2”, turn 90 degrees and score at 1”.
Step 18: Miter and cut of the tiny square pieces at the bottom.
Step 19: Miter and cut the larger end pieces at the top.
Step 20: Fold over on all score marks and use your bone folder to achieve a crisp edge.
Step 21: Add the rounded edge card stock to the end with the 1” scored end using adhesive.
Step 22: Cover your plain card stock with patterned paper. (2) pieces -rounded on ends at 5 3/8 x 4 and (2) pieces at 5 3/8 x 4 - not rounded.
Step 23: Repeat steps 15-22 (3) more times.
Step 24: Cut your Spellbinders Book Spine out in heavyweight card stock.
Step 25: There are (4) sets of (3) lines perforated for you. Take the center line and pinch together make a “hill” and crease. Fold that piece away from you and crease again, then fold toward you and crease again. This should create and upside down v” or valley, hill, valley. Repeat this step for the remainder of the three sets. There should be a small gap in between each set.
Step 26: Once complete, go over all of your pleats with a bone folder.
Step 27: Flip to the back and use wet glue to pinch and attach each of the sets to each other - separately.
Step 28: Follow the pre-set guide lines on each side of the spine to make your finish size proximately 2” in width.
Step 29: Cut down your pattern piece for the inside spine (1) 5 3/8 x 1 7/8.
Step 30: Cut down your (2) outside and (2) inside covers with patterned paper. (4) 5 5/8 x 4 3/8
Step 31: Using 1/4” scrappy tape and add to both side of the spine piece. Use your bone folder to secure.
Step 32: Remove the right side of the double sided tape from the last row of the spine. Add the open end (bottom) of the envelope and but right against the spine and secure use your bone folder.
Step 33: Grab the top layer of the envelope / last piece and add tape to (3) sides. Leaving the top of the card stock to be the opening for the pocket.
Step 34: Lay top layer piece to the open envelope securing all the edges - two sides and the bottom.
Step 35: Repeat this (3) more times and be sure to line up the ends with the previous envelope to make sure they are even.
Step 36: Add hot glue (preferred) or double side tape to the completed spine back piece and add to the center of the album on the spine. Secure with your bone folder.
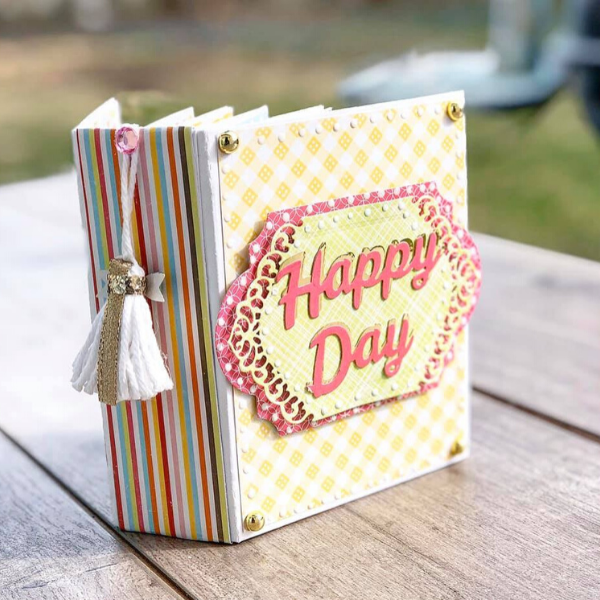
Step 37: Cut out and layer the A2 Devine Eloquence on top of the Labels Twenty-Eight die (2nd from the largest) using 3D foam Squares.
Step 38: Add 3D foam squares to the bottom of that stack and center on the mini album cover.
Step 39: Cut out the Happy Days Die set. (1) in gold and (1) in sold color card stock.
Step 40: Use wet or spray glue to adhere them - with an offset or shadow.
Step 41: Adhere both of those sets to the center of the previous die cut stack.
Step 42: Add flat back pearls to the (4) corners of the mini album.
Step 43: Use Crystal Nuvo Drops to add fine detail to the cover of the mini album around the perimeter of the album and die cuts center piece.
Products Used:
Spellbinders Shapeabilities Dies - Universal Accordion Fold Spine
Spellbinders Nestabilities Labels Twenty-Eight
Spellbinders Bold Type Happy Day
Scrapbook Adhesives 3D Permanent Foam Squares - White 1/2" x 1/2", 126 pk
Art Glitter Glue
Scrapbook Adhesives E-Z Runner Grand Refillable Dispenser
Nuvo Crystal Drops - Simply White


