
Instructions:
Hello everyone!! My name is Berina, it's great to meet you all again, through Scrapbookpal blog. Today I have a cute baby card - I made this gender neutral, but you can make it in pink or blue too. This year, lots of our friends (and us) had/will have babies. I've been making welcome baby cards and baby related thank you cards a lot more than other years. I made this card for one of our friends who had her baby shower recently.
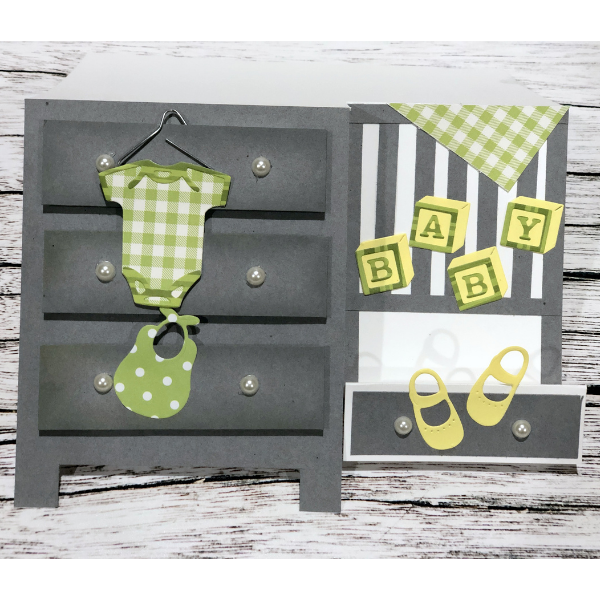
I love making cards that have different than normal folds, but I don't make them as often as I'd like to. I want the baby cards to be really special, so I try to make them a special fold. This is a side step crib and dresser card.
First I took a 100# card stock and cut it to 7" x 10". I then cut and scored the card to make it in to a side step card.
Next I cut the pieces for the dresser. I used grey card stock for the furniture. I cut a piece of size 4" x 5" and cut off a tiny piece at the bottom to make it look like it had 2 legs. I then cut 3 pieces of size 1" x 3 1/2" for the drawers.
On to the crib part now. The crib is made of tiny strips of card stock. I cut 2 strips of length 4" for the vertical frame, 2 strips of length 3" for the horizontal frame and 5 strips of length 2 3/4" for the railings. It might look a little daunting, but trust me, it's so easy. Having a grid underneath helps in adhering the strips uniformly. I adhered the railings to 1 of the horizontal frame. Then I adhered the other horizontal frame to the vertical pieces of the frame. Then adhere them all together. Doing it in this order was easier for me.
Now back to the dresser. I sponged some Memento London Fog ink to the edges of the drawers. The card stock color was very close to this color, so adding the ink gave a slight definition to the drawers.
Now comes the fun part - putting all together. I used foam tape to adhere the drawers on to the dresser. For the rest, I used glue. I added a drawer below the crib and added pearls for all the drawer pulls.
The cute stuff - I die cut all the pieces for the cute baby onesies, bib and blocks using the Sizzix Thinlits Dies - New Baby #2 by Lisa Jones die set on green pattern paper and yellow card stock. I cut a triangle out of green pattern paper to make the blanket. I assembled the pieces and adhered them together to make the baby embellishments.
The onesie deserves a hanger I think. So I used a paper clip to make the hanger. I adhered the hanger to the back of the onesie. There's something about onesies on hangers!!
Here's the fully embellished card! How cute is that!!
What do you think? I loved how this had turned out. The recipient and the others in the baby shower loved it. Please let me know your thoughts and comments!
Thank you for stopping by today. Have a great day!
-Berina
Blog: https://moxiecraftie.blogspot.com/
Instagram: @moxiecraftie
Products Used :
Sizzix Thinlits Dies - New Baby #2 by Lisa Jones
Tsukineko Memento Dew Drop Dye Inkpad - London Fog

