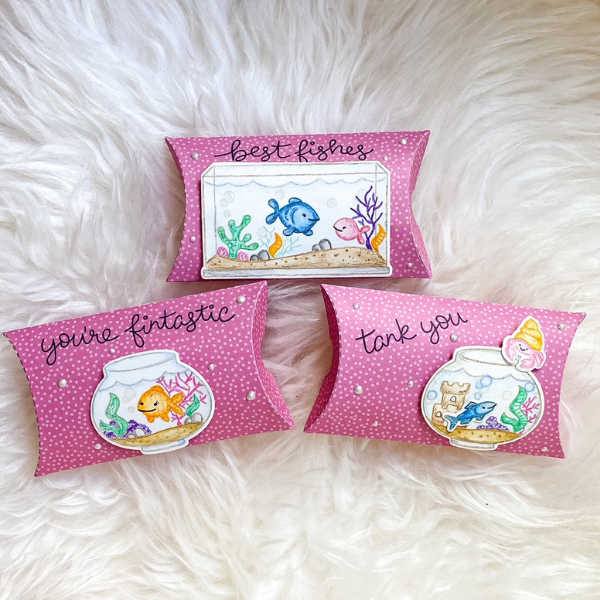
Hi creative friends, SweetD here from SweetDcreations11 & I’m back to share this adorable set of 3 pillow box gift card/gift boxes, that I crafted using some super fun Lawn Fawn products. These pillow boxes have a bunch of tiny details that would make any recipient smile for sure, and they could be used for gifts such as jewelry, candies, & even gift cards!! I love having creations like these on hand for easy last minute gift giving to teachers, friends & family. Today I’ve paired the Pillow Box die with the Fintastic Friends stamp set to create a really fun combo I think you’ll really enjoy crafting!! I hope you have fun with my step by step guide & Tanks for following along!!
Step 1: I chose a double sided pink & rainbow card stock, then cut it 3 times using the the Lawn Fawn Pillow Box die. I liked using a double sided card stock because it jazzed up the inside but it would be just as cute with any one sided paper you have on hand.
Step 2: I used all three of the sentiments in the Fintastic Friends stamp set & stamped one of each directly onto the pillow boxes using Lawn Fawn Deep Sea ink.
Step 3: I used watercolor card stock to stamp out 3 different mini fish tank scenes with various images in Antique Linen Distress ink, because I did no line watercolors for these images. You could easily swap the watercolors for any medium you like, this just happens to be my favorite way to color.
Step 4: Once all my images were stamped I started adding color with my Faber-Castell Albrecht Dürer watercolor pencils. I like to add small amounts because they are heavily pigmented and these are tiny images. I usually color in a bit of each of the images first and then go back in with water and a paint brush little bits at a time until I get a nice blend that I’m happy with.
Step 5: I am watercolor illustrator, so I LOVE adding details to my creations that are hand drawn. It allows me to add many fun items that aren’t included in the stamp set and ALSO cuts out the need for micro masking and things like that. So once I had all my images painted how id like them to look I then used my coordinating set of Faber-Castell Polychromos colored pencils & added details to the stamped images, and added some fun tiny hand drawn elements as well. The hand drawn images were very easy, I didn’t really pay much attention to making them perfect as it looks better for background images if they are a little bit less perfect.
Step 6: Once everything was painted & my hand drawn images were finished I cut out the fish tanks & accessory images using the coordinating die set.
Step 7: I stamped a few bubbles around my mini scenes using the smallest bubbles from the stamp set, in both Jellyfish & Moonstone inks for a dimensional look. Then I embellished each bubble with glossy accents.
Step 8: Each mini tank has many fun shiny details which I added using a mix of 4 colors of Ranger Stickles. I wanted each scene to have a shiny & a sparkly element so I didn’t really plan it out I just added bits here & there making sure they were scattered around instead of all next to each other. The colors I used were Unicorn, Hibiscus, Palm Leaf, & Sunburst.
Step 9: I adhered the mini tanks onto the front of my flat unassembled Pillow boxes using dimensional foam squares, making sure to leave space between each so that it could easily bend and not warp the box once assembled. Glue would also work perfectly fine but I would not recommend using solid strips of foam tape because there will not be enough bend for the image to wrap around the box properly when assembled. Then I used 1/4 Scor tape on the flap to finish assembling my boxes.
Step 10: Lastly I applied a few drops here & there to fill in any empty space on the base of the pillow box, with Nuvo Crystal Drops in the color Ivory Seashell. I feel it added the perfect tiny edition to really complete the project.
And that’s it, I hope you fully enjoyed this step by step process & have so much fun making them for yourself. Be sure to check out my Instagram @SweetDcreations11 for more watercolor creations & let's continue to spread crafty love whenever we can!! I hope you all have a wonderful day.
Products used:
Lawn Fawn clear stamps- Fintastic Friends SKU: LF891
Lawn Fawn Lawn Cuts- Fintastic Friends SKU: LF892
Lawn Fawn Lawn Cuts- Pillow Box SKU: LF985
Lawn Fawn Lawn Inks- Jellyfish SKU: LF2272
Lawn Fawn Lawn Inks- Deep Sea SKU: LF865
Lawn Fawn Lawn Inks - Pumpkin Patch Ink Cubes Pack SKU: LF1533
Ranger Inkssentials Mini Glossy Accents 0.5 oz SKU: GAC27898
Ranger Stickles Glitter Glue - Palm Leaf SKU: SGG65722
Ranger Stickles Glitter Glue - Sunburst SKU: SGG65739
Ranger Stickles Glitter Glue - Hibiscus SKU: SGG65708
Ranger Stickles Glitter Glue - Unicorn SKU: SGG65746
Nuvo Crystal Drops - Ivory Seashell SKU: 675n
Scor-Tape 1/4” x 27 yds SKU: SP202
Art Glitter Designer Adhesive - Dries white SKU: DDW
Nuvo Watercolour Pencils - Brilliantly Vibrant SKU: 520n


