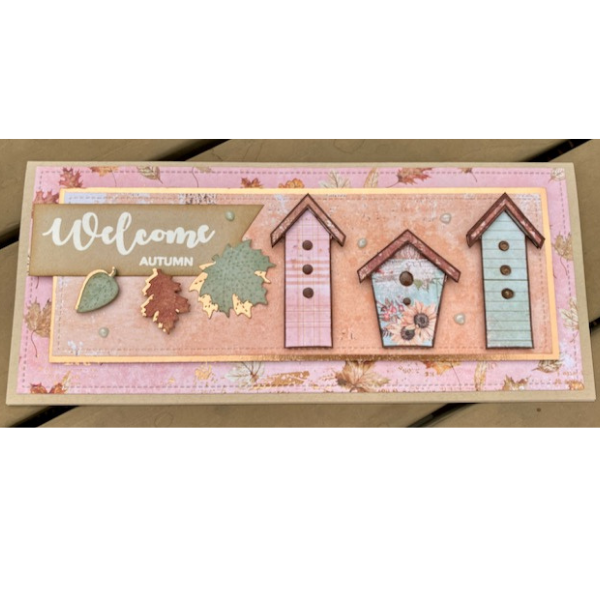
Hello everyone! Today we are going to create a slimline card using the Welcome Home stamp set by Gina K Designs. To create the card base trim a piece of Neenah Desert Storm cardstock to 7-½ x 8-¾ then score along the 7-½ side at 3-¾ to create a 3-¾ x8-¾ slimline card base. Using the Lawn Fawn Large Slimline die cut one large panel from patterned paper and the smaller one from white cardstock. Adhere the white cardstock to the inside of the card and the large panel to the front of the card. Die cut another panel using the Lawn Fawn Small Slimline die from a coordinating pattern paper. Since my patterned paper had rose gold foiling I trimmed out a panel of rose gold foil cardstock ⅛ inch larger than the patterned paper and layered the two pieces together. Die cut the Lawn Fawn small stitched leaves from patterned paper and foil cardstock. I cut three from foil and six from patterned paper.
Instead of coloring the birdhouses from the stamp set we are going paper piece them together with some pretty fall pattern paper.
Stamp the birdhouses from the Welcome Home stamp set using Memento Rich Cocoa ink onto patterned paper. Stamp just the roof portion of the birdhouses onto a coordinating pattern paper. Fussy cut the birdhouses with your detailed scissors. Fussy cut just the roof portion of the birdhouses as well. Using small strips of foam adhesive adhere the roof portion to each of the birdhouses.
Stamp the sentiment onto a piece of Neenah desert storm cardstock using VersaMark and heat emboss with white embossing powder. Trim out the sentiment and flag the right end creating a banner. Ink the edges using Vintage Photo Distress ink. Trim a strip of matching pattern paper to measure ½ x8-¼ and adhere it to the inside of the card along the bottom. (see photo for placement) Add three small die cut leaves to the inside as shown.
Layer the small panel onto the front of the card with foam adhesive. Add the three birdhouses as shown with foam adhesive. Adhere the sentiment banner with wet glue. Using a combination of wet adhesive and foam adhesive add the leaves to the front of the card as shown.
Place dots of Nuvo Dream Drops in Frosted Lake to the front of the card as shown and add glossy accents to the openings of the stamped birdhouses.
Check out the video tutorial (below) for more details.
Video:
Products Used:
Gina K. Designs Stamps - Welcome Home
Lawn Fawn Lawn Cuts - Small Stitched Leaves
Lawn Fawn Lawn Cuts - Large Slimline with Sliders
Lawn Fawn Lawn Cuts - Small Slimline with Lift the Flaps
Lawn Fawn Embossing Powder - White
Tsukineko Memento Dew Drop Dye Inkpad - Rich Cocoa
Nuvo Dream Drops - Frosted Lake
Ranger Inkssentials Mini Glossy Accents, 0.5 oz.
EK Success Cutter Bee Scissors
Scrapbook Adhesives Crafty Foam Tape - White, 13 ft


